How to securely expose Plex from behind CGNAT with Cloudflare Tunnel
Exposing Plex normally involves port forwarding from the router, which is very insecure and not recommended. If your home network is behind CGNAT - very common with most ISPs nowadays -- you can't even port forward if you wanted to. Here's how I did it in a fairly secure way that limits access by using Cloudflare.
Table of Contents
What and Why
Plex is a self-hosted media server that lets you stream your owned (or downloaded, or otherwise acquired) media from other devices on the same network, through a web-based GUI (access via browser) or dedicated app. (Say, on a smart TV or Roku device.) Plex has a built-in feature to share your media library externally, but that requires opening a port on your router and forwarding it to the Plex server. Setting aside that port forwarding can be dangerous if you don’t know what you’re doing, it won’t work anyway if your home network is behind Carrier-Grade Network Address Translation, or CGNAT. Many ISPs use this, and so many homelabbers may find themselves unable to expose their services.
Although there are many solutions to get across CGNAT, for Plex I’ve found that using Cloudflare Tunnel is the one with the least hassle. Cloudflare Tunnel provides a secure connection to a network resource behind CGNAT and without exposing your public IP, by running a cloudflared daemon on your server. As a by-product, the traffic flows through Cloudflare’s CDN and gets all the features that come with that, including security through their Web Application Firewall. In this post I will demonstrate how I have been sharing my Plex library through a Cloudflare Tunnel and only allowing access from specific IP addresses.
You’re probably much better off following this blog post to expose Plex through CGNAT with Tailscale instead of using exposing it via Cloudflare Tunnel as I write about below. Technically speaking, Cloudflare Tunnel is NOT intended for routing video and audio streams, it’s intended purpose is routing HTTP traffic for webpages. In fact, the Cloudflare Service-Specific Terms for their CDN specifically state:
“Unless you are an Enterprise customer, Cloudflare offers specific Paid Services (e.g., the Developer Platform, Images, and Stream) that you must use in order to serve video and other large files via the CDN. Cloudflare reserves the right to disable or limit your access to or use of the CDN, or to limit your End Users’ access to certain of your resources through the CDN, if you use or are suspected of using the CDN without such Paid Services to serve video or a disproportionate percentage of pictures, audio files, or other large files.”
In addition, the section of the Cloudflare documentation about delivering videos with Cloudflare spells this out:
“Over time we recognized that some of our customers wanted to stream video using our network. To accommodate them, we developed our Stream product. Stream delivers great performance at an affordable rate charged based on how much load you place on our network. Unfortunately, while most people respect these limitations and understand they exist to ensure high quality of service for all Cloudflare customers, some users attempt to misconfigure our service to stream video in violation of our Terms of Service.”
Be aware that by using Cloudflare Tunnel, you are routing traffic through Cloudflare’s CDN (can’t have one without the other) and so using it with Plex violates their terms of services and may cause Cloudflare to limit or potentially outright ban your account. By following this guide, you agree to take the risk that such action may occur, so think carefully about this warning and whether it’s worth it.
Cloudflare can see all traffic routed through their CDN and know when that traffic is video streaming. They may not care if it’s just you streaming video once in a while, or if you’re not using a lot of bandwidth, but constant use by multiple IPs will almost certainly rouse their attention and can lead to action being taken against you. You’ve been warned!
Pre-Requisites
This guide will assume you are already running Plex, and you’re just looking to add a Cloudflare Tunnel so that you can share your library with other users. To that end, you will need a Cloudflare account.
You will either be running the Cloudflare Tunnel on the same server as Plex (preferable) or on another machine on the same network that has access to the Plex server. This guide assumes that all hardware is running Linux, since that is the only OS I’ve used to run either Plex or cloudflared. Other options are available, and you should be able to tweak these instructions to work on other platforms.
In addition, the usage of Cloudflare Tunnel requires owning a domain. (Using a Dynamic DNS like DuckDNS or No-IP will not work.) If you need to purchase one, I suggest Namecheap, Porkbun or Cloudflare themselves.
Finally, I’ll be using Docker in order to run the cloudflared daemon as a container. You can run the daemon bare metal, but I prefer doing it as a container for that additional layer of abstraction, and so I can easily shutdown and restart the Cloudflare Tunnel as needed.
So if you have not already, install docker with the following command: (This will execute a bash script to install Docker with all dependencies and add-ons.)
curl -fsSL https://get.docker.com | sh
Add a domain in Cloudflare
Create your free Cloudflare account if you haven’t already. If you bought a domain on Cloudflare, you can skip to the next section since it is auto-configured already. If your domain is from another registrar, we’ll need to add it to Cloudflare:
-
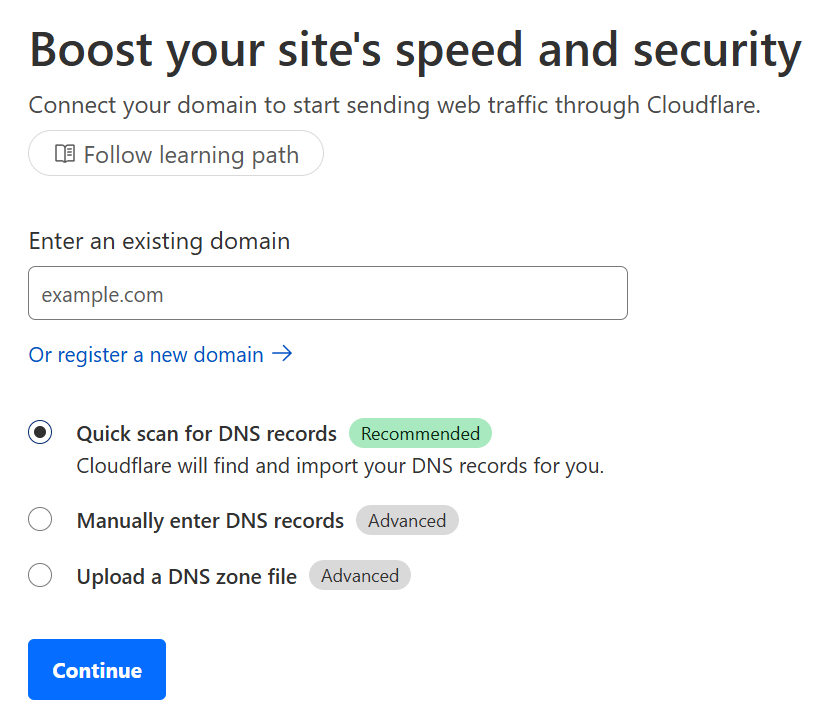
On the Cloudflare dashboard Account Home, click the + Add a domain button.
-
Enter your domain, leave Quick scan for DNS records selected, and click Cotinue.
- Click on the Free plan at the bottom and click Continue.

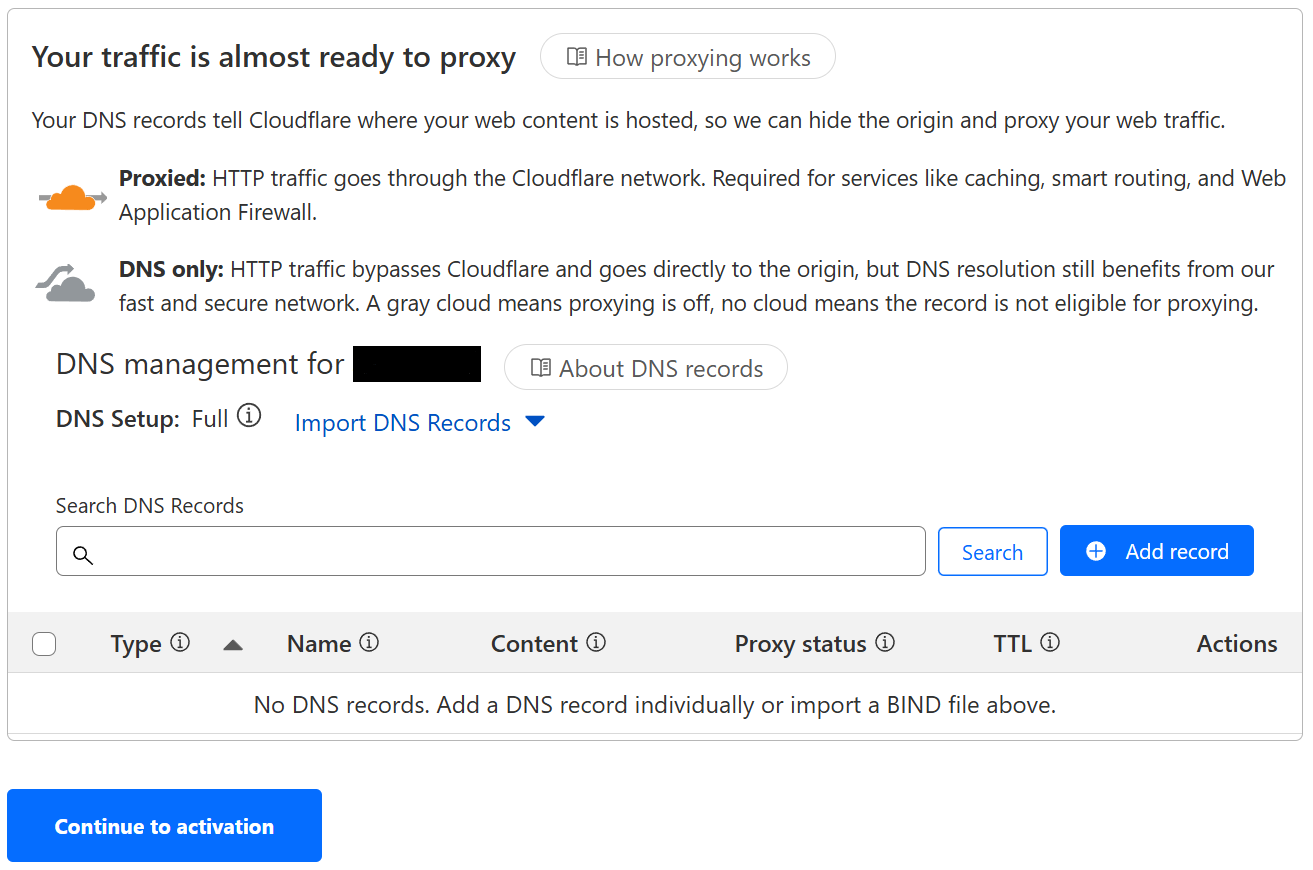
- You’ll see your DNS records, if there are any. Don’t worry about this right now and click on the Continue to activate button.
- You’ll see a pop-up window saying you should set your DNS records now, click on Confirm.

-
Now you’ll be provided some instructions to update the nameservers on your domain’s registrar, open a new tab and follow those instructions. Once you’ve added the Cloudflare nameservers at your registrar, go back to Cloudflare and click on Continue.
-
Now you’ll have to wait a few minutes for the changes to propagate, then click on Check nameservers and reload the page. If it’s still shows Pending next to the domain at the top, just keep waiting and reload again after a few more minutes.
-
Once the domain is Active, you’re ready to set up the Cloudlare Tunnel.
Create and configure the Cloudflare tunnel
In the Cloudflare dashboard, from your domain’s Overview page, click on Access on the sidebar, and then on the next page click Launch Zero Trust. Once you’re in the Zero Trust dashboard, do the following:
- On the sidebar, go to Network and choose Tunnels from the dropdown.

- Click on Add a tunnel, then on the next page choose Select Cloudflared.

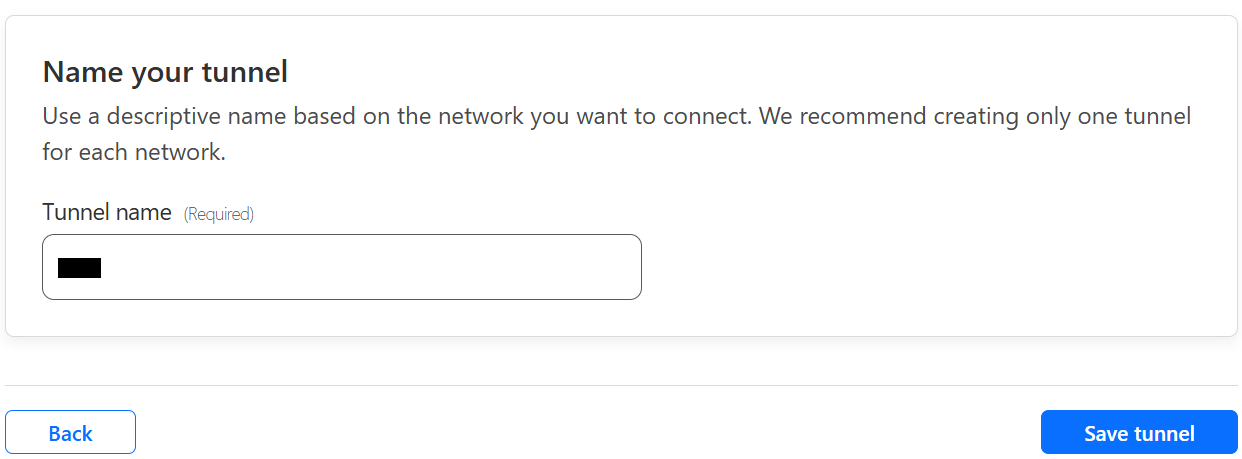
- On the following page name your tunnel, then click Save tunnel.
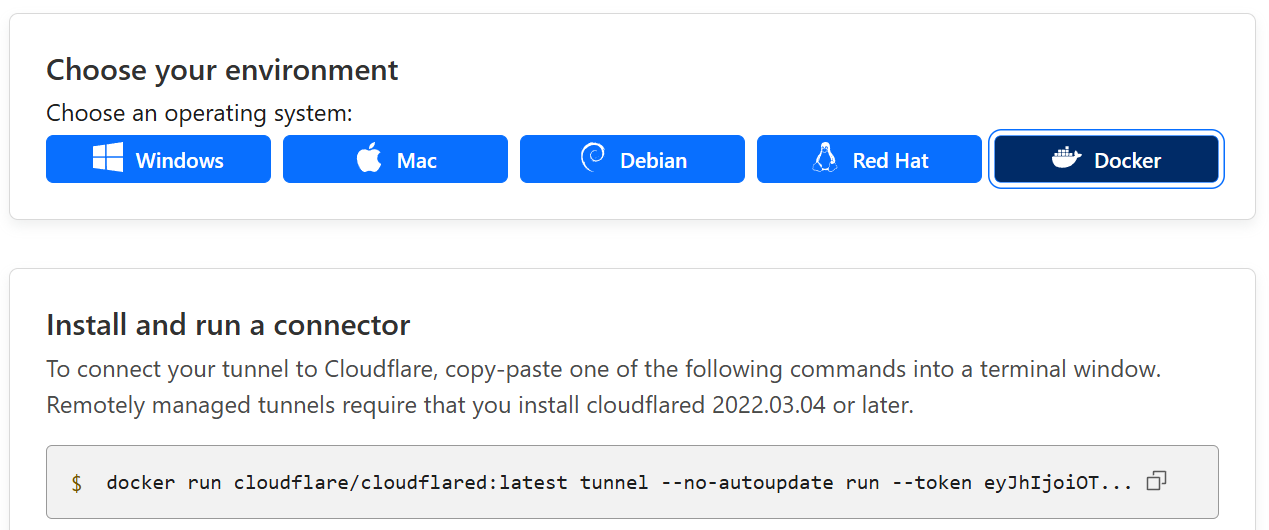
- Finally you’ll be given a
docker runcommand for cloudflared, but we’ll usedocker composeinstead. All we will need from here is the tunnel token.
- Create a
compose.yamlfile, copy and paste the below into it:
services:
    restart: unless-stopped
    container_name: tunnel
    image: cloudflare/cloudflared:latest
    command: tunnel run
    environment:
      - TUNNEL_TOKEN=
- Add the tunnel token to the
TUNNEL_TOKEN=environmental variable, then save the file and let’s run docker compose again. (It will automatically addcloudflaredand restart thenginxcontainer.)
docker compose up -d
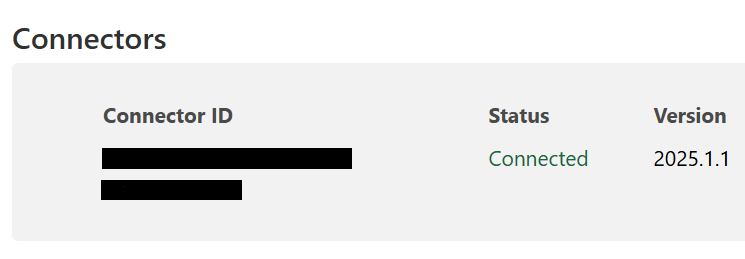
- Once the container is up and running, at the bottom your connector status should be Connected. Once the tunnel is Connected, click the Next button.
-
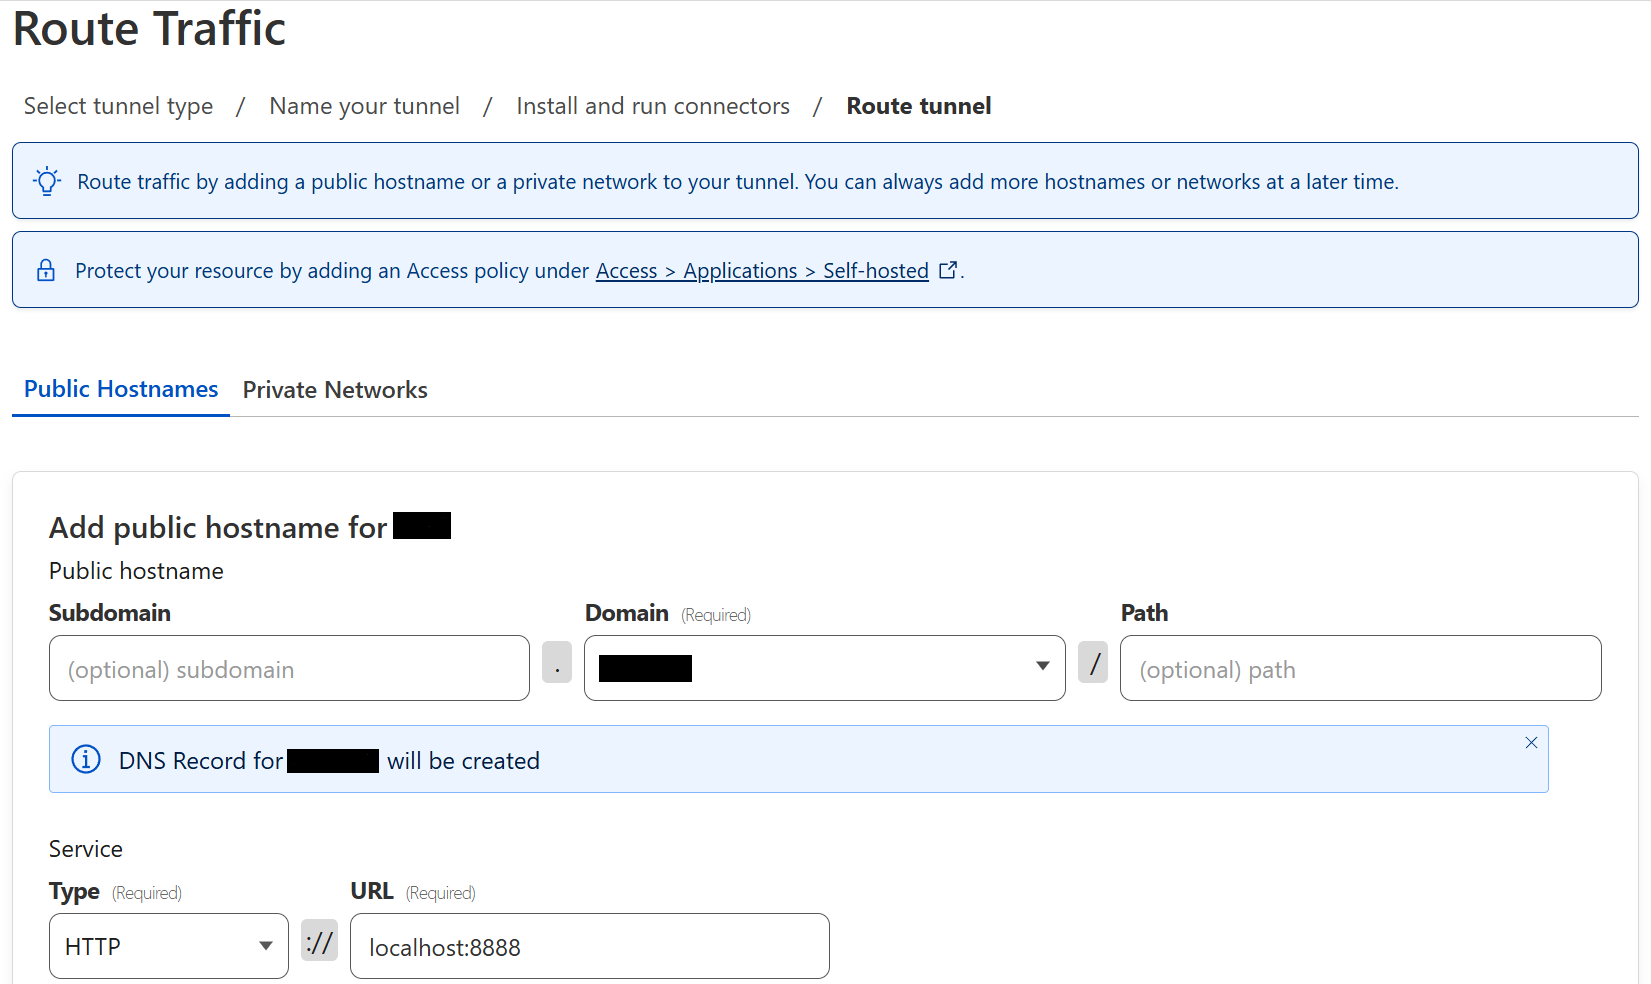
Now you’ll be in the Route Traffic page, under the Public Hostnames we have to add some things. For our purposes (hosting a site at the root of
your-domain.com) you should leave the Subdomain empty. If you prefer for your site to be accessible at, say,blog.your-domain.comthen set that subdomain here. -
For Domain type in
your-domain.com. -
Leave the Path empty, unless you want the URL to be something like
your-domain.com/blog. -
Under Service, for Type select
HTTP(not HTTPS) from the dropdown menu. -
For URL, put the full LAN (internal) IP address of the machine that will host the site, and append the port you set for the docker container — for example
192.168.1.100:8888. (Don’t uselocalhost:8888despite what the example says, that never works for me.)
- When done filling everything in, click Save.
Now you will be back at the Tunnels page. Under Your tunnels, the tunnel you just created should appear and still show Healthy status.

Finally, we need to configure SSL for the website!
-
From the Cloudflare Zero Trust dashboard, click on the back arrow next to your account name at the top of the sidebar to return to the regular Cloudflare dashboard.
-
Click on your domain and then click on SSL/TLS on the sidebar.
-
You’ll now be in the SSL/TLS Overview, click the Configure button.

- Select Automatic SSL/TLS (default) then click Save.
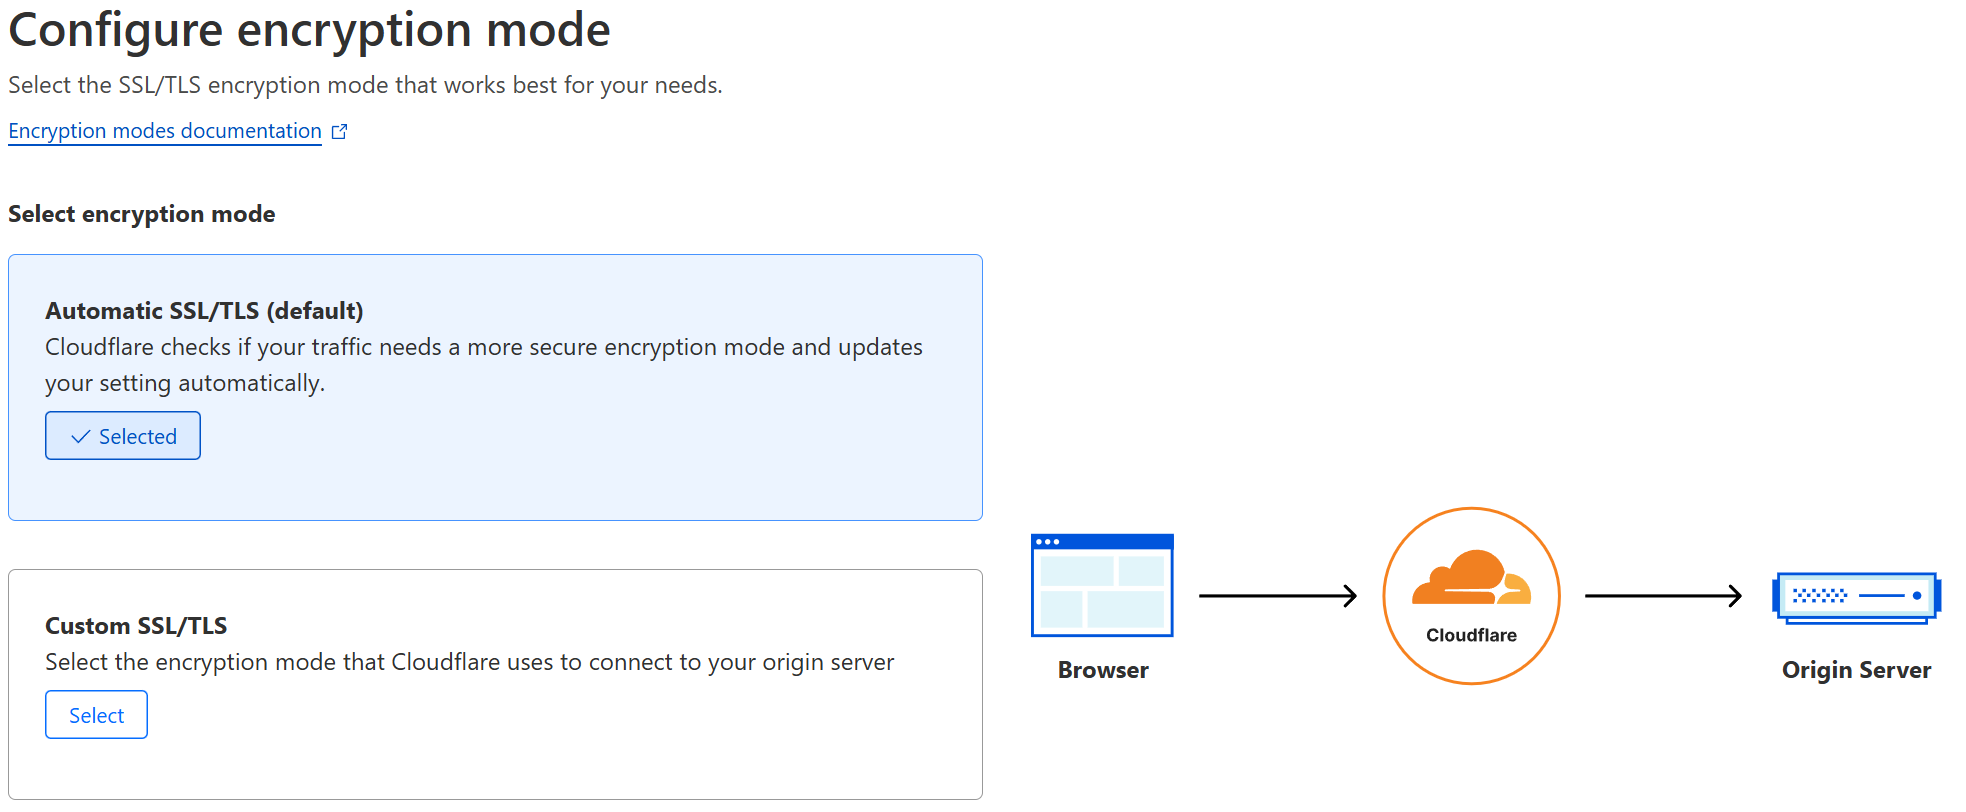
If you run into any HTTPS errors later when trying to access your site, come back to this page and try instead to select Custom SSL/TLS and choose Full (Strict) or Full instead. Automatic should work in most cases, though.
Now you should be able to visit https://your-domain.com and see your website!
Now you should be able to go to https://plex.your-domain.com and you should reach the Plex UI and be prompted to login! However, right now Plex is fully exposed to the entire internet. We need to use Cloudflare’s WAF to restrict access to only who we want!
Configure security settings
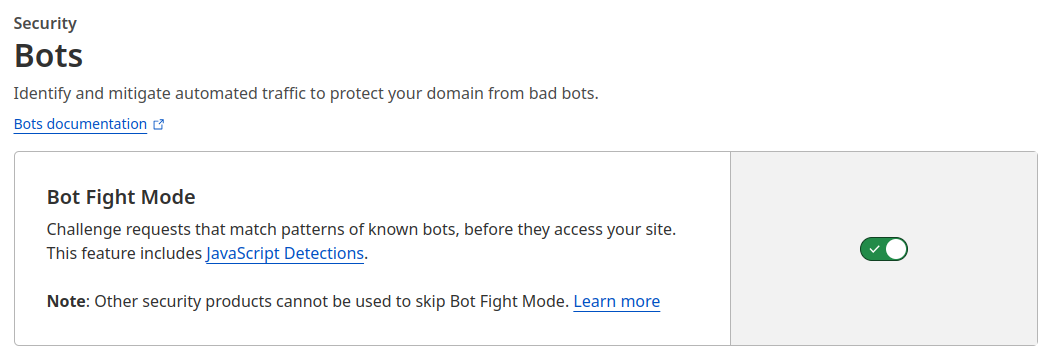
First, we’re going to enable some security features to block bots.
- On the Cloudflare dashboard, go to Security -> Bots on the sidebar, and enable Bot fight mode.
-
Next, go to Security -> WAF on the sidebar.
-
Click the Custom rules tab and then the Create rule button.
-
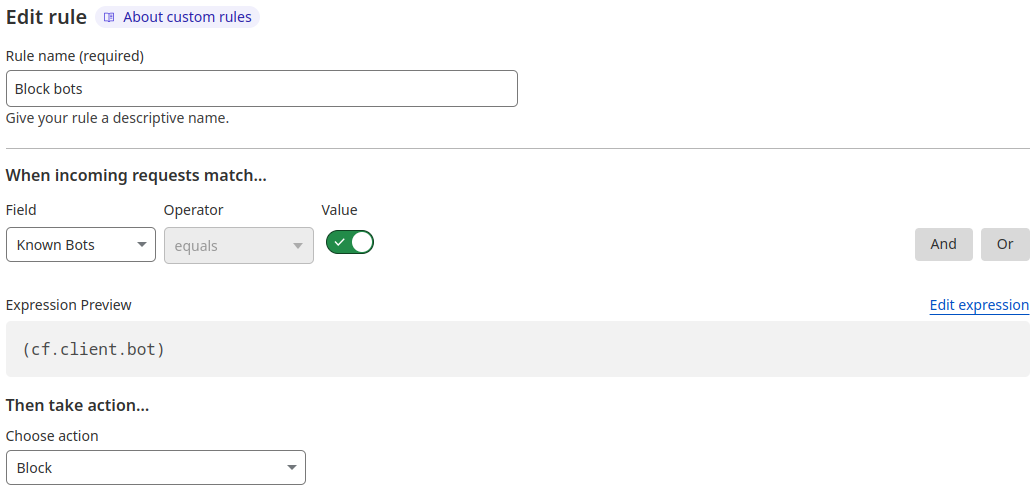
Name the Rule as
Block bots, then scroll down to When incoming requests match…. -
For Field choose
Known Bots. -
Under Then take action… choose
Blockas the action. -
Click on Deploy to finish.
For this next part, you will need the specific IP addresses of your external users, because we’re going to make Cloudflare block everyone except for those IP addresses. In most cases, even when ISPs don’t offer a static IP, a specific customer’s IP address rarely changes, so you should be safe doing this. On the rare occassion where a user’s public IP address changes, you can just come in here and update it. Sometimes prioritizing security means dealing with inconvenience.
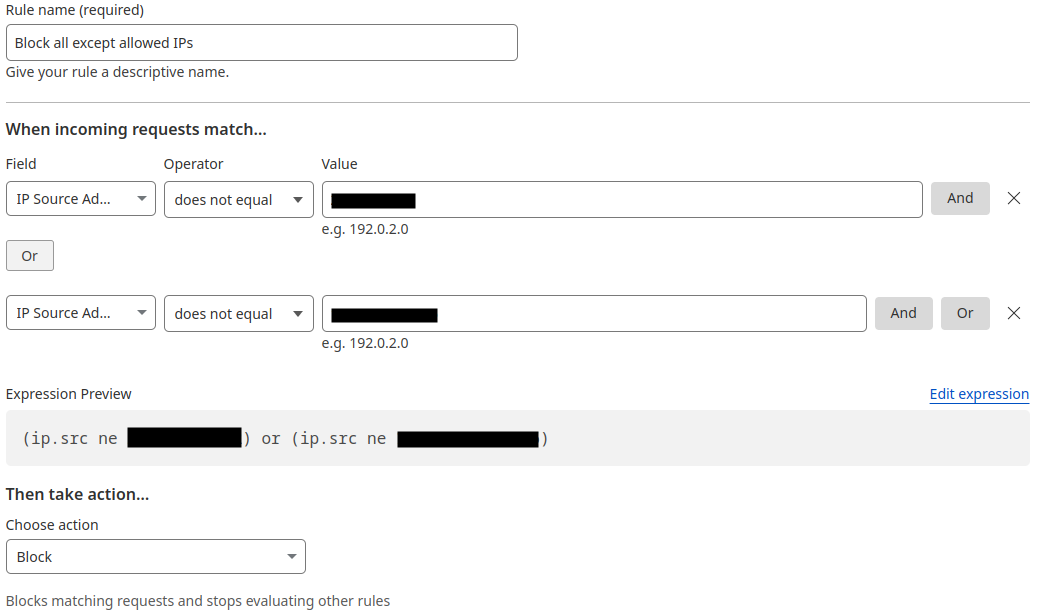
Now, we’re going to create a rule that blocks EVERYONE except specific IPs.
-
On the Cloudflare dashboard, go to Websites and choose your domain.
-
On the sidebar, go to Security -> WAF.
-
Click the Custom rules tab and then the Create rule button.
-
Name the Rule as
Restrict IPs, then scroll down to When incoming requests match…. -
For Field choose
IP Source Address. -
For Operator choose
does not equal. -
For Value type in the public IP address.
-
Repeat these steps for each IP address you want to allow access.
-
Under Then take action… choose
Blockas the action. -
Click on Deploy to finish.
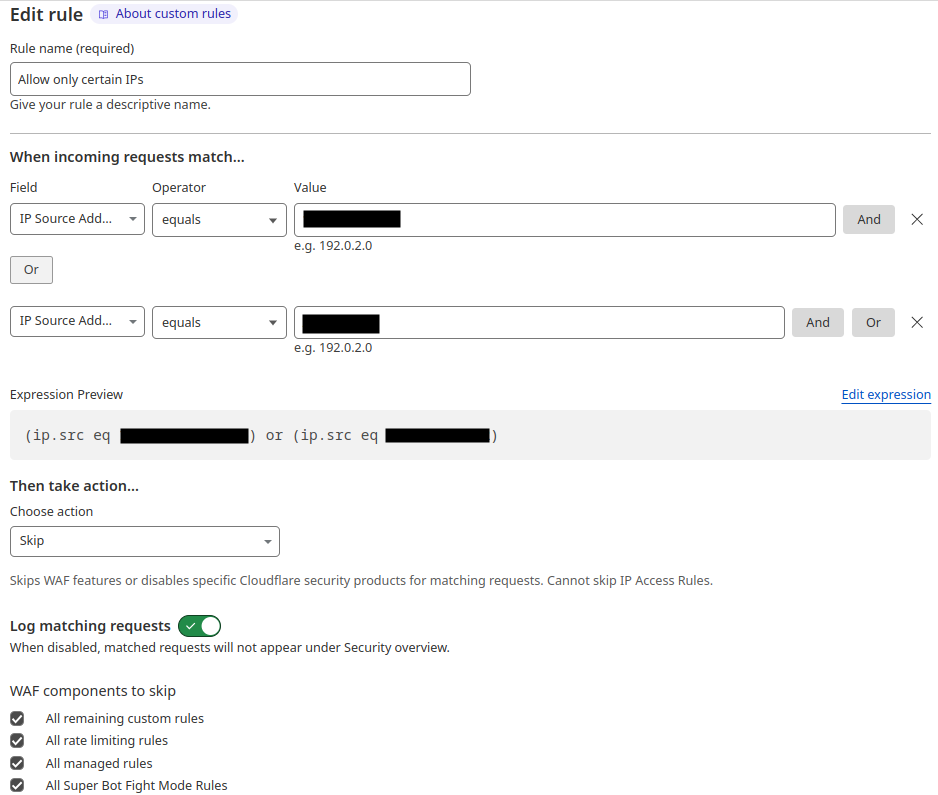
Next, I like to create an additional rule that lets external users’ IPs skip the WAF altogether. This ensures those IPs can get in, and has the side-effect of making connections from these IPs show up as events in WAF, which is nice for monitoring. (They will show as Skipped in the Events activity log.)
-
On the Cloudflare dashboard, go to Websites and choose your domain.
-
On the sidebar, go to Security -> WAF.
-
Click the Custom rules tab and then the Create rule button.
-
Name the Rule as
Allow IPs to skip WAF, then scroll down to When incoming requests match…. -
For Field choose
IP Source Address. -
For Operator choose
equals. -
For Value type in the public IP address.
-
Repeat these steps for each IP address you want to allow access.
-
Under Then take action… choose
Skipas the action and enable the checkmarks for all WAF components. -
Click on Deploy to finish.
Now let’s set the order of these rules in WAF.
-
On the Cloudflare dashboard, go to Security -> WAF on the sidebar.
-
Click the Custom rules tab and then the Create rule button.
-
Drag and drop the rules so that Allow IPs to skip WAF is first, Restrict IPs is second and Block bots is third.
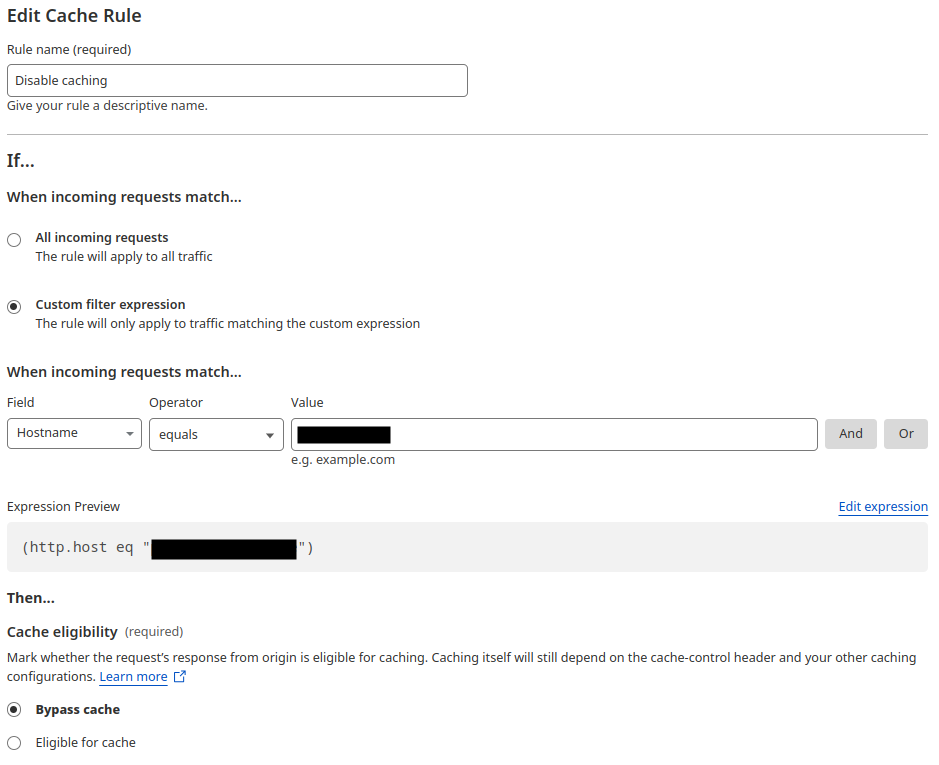
Finally, let’s disable caching to minimize CDN usage by our external users and ensure all content always comes directly from the origin.
-
On the Cloudflare dashboard, go to Websites and choose your domain.
-
On the sidebar, go to Caching and click Cache rules.
-
Click on Create Rule.
-
Name the Rule as
Disable caching, then scroll down to When incoming requests match…. -
For Field choose
Hostnamefor field -
For Operator choose
Equals -
For Value use your domain, e.g.
plex.your-domain.com. (Leave out the HTTPS.) -
Under Cache eligibility choose Bypass cache.
-
Click on Deploy to finish.
Configure Plex
One last thing! Although your external users can now stream your library by logging in to the the Plex web UI at https://plex.your-domain.com, using Plex apps will not work until you do the following:
-
On the Plex web UI, go to Settings by clicking on the wrench icon at the top-left.
-
On the sidebar, scroll down to Settings and click Network.
-
Next to Secure connections, choose Preferred from the downdown menu.
-
(Optional) Scroll down and enable the checkbox for Treat WAN IP as LAN Bandwitdh.
-
Make sure to leave disabled the checkbox for Enable Relay.
-
Under Custom server access URLs type in your tunnel URL, e.g.
https://plex.your-domain.com(Make sure to include the HTTPS!) -
At the bottom of the page, click the Save changes button.
Now your external users can access your library through their Plex apps too.
Potential alternatives
There’s always multiple ways to do things, and said I explained at the start, this method of sharing your Plex library may not be best. It’s just what works for me, for now, so I figured I’d share it for others to try out. Some other alternatives that I’ve read about, but have not tried myself:
-
Tailscale, a Wireguard-based overlay network for connecting devices across different networks. As I mentioned at the top of this article, I chose to use Tailscale with a free Oracle VM to expose Plex and strongly suggest it to anyone!
-
Zero Tier: I have not used it myself, but Zero Tier is a similar product to Tailscale for similar use cases, namely securely connecting to your network from outside. I have read of people using it to access Plex remotely, but it requires each external user to run Zero Tier. (Just like Tailscale.)
-
Zrok: A newer kid on the block, free to self-host. I’ve read enough to know that you can use it for secure peer-to-peer connections and use tunnels for public sharing, but no idea how it would work with Plex. I did find this blog post from December 2022 about using a component of OpenZiti called BrowZer to remotely access Plex, but it seems they have not written anything further about this possible use case since then.
-
Some others I’ve heard of, but have not touched or read about include Ngrok, Netmaker and Netbird.
References
- Cloudflare Service-Specific Terms
- Cloudflare Docs - Add a site
- Cloudflare Docs - Tunnels
- Cloudflare Docs - Routing traffic to a tunnel
- Cloudflare Docs - Identity
- Cloudflare Docs - Policy Management