How to use Pi-hole from anywhere with Tailscale
Tailscale is my new homelab toy. I've been using it to access my media on the go, to connect to a VPS for sharing my Plex library with family, and now with on-the-go adblocking on my phone, tablet and laptop. Here's how.
Table of Contents
About Tailscale
Tailscale lets you set up a mesh virtual private network (VPN) for secure access to devices and self-hosted services on your home network from anywhere using the Wireguard protocol. An overlay mesh network known as a Tailnet is created that all devices running Tailscale will join, with traffic between devices going through an encrypted Wireguard tunnel and using NAT traversal, without the need to open ports on your router.
The personal plan is free, allows three users and up to 100 devices. I use it mainly to access Plex on my home server (though I can access all my self-hosted apps) and use my Pi-Hole as DNS through my phone, tablet and laptop when I’m not home, and that is what this guide will help you do. For details, see this blog post about how Tailscale works.
The goal
When all is setup and working, your client devices (say phone, tablet and laptop) will automatically use your Pi-hole server as DNS when connected to Tailscale. This guide will show you how to get up and running with Pi-hole and Tailscale on a Linux machine (the server) and running Tailscale VPN on a phone, tablet and laptop (the clients).
Note that I will mostly be following the official instructions from the Tailscale documentation, so refer back to them when in doubt or if something I write below doesn’t make sense.
I’ll be setting this up on a Libre Sweet Potato in my home running Debian, but everything should work the same on Ubuntu or other distributions.
Set up Tailscale
We’ll set up Tailscale first, although you can have Pi-hole installed beforehand. Which one comes first doesn’t really matter.
First, go to the Tailscale website and create an account. This will create your Tailnet with your newly created account as the Owner and which you’ll manage through the web-based admin console.
On your Linux server, use the following command to run the Tailscale install script:
curl -fsSL https://tailscale.com/install.sh | sh
By default using most Tailscale commands requires superuser privileges, i.e.
sudo. You can change that with the commandsudo tailscale set --operator=$USER, the specified user will then be able to execute Tailscale commands withoutsudo. The rest of the guide will assume you did this.
Once it’s finished installing, we’re going to run Tailscale and pass a flag, which I’ll explain in a second:
tailscale up --accept-dns=false
Adding the --accept-dns=false flag will make this machine ignore the global DNS we’ll be setting up in Tailscale later. Since we’re going to make the Pi-Hole be our DNS server, we don’t want Pi-Hole trying to use itself as its own upstream. The flag will tell Pi-hole to keep it’s own local DNS settings.
You should also use
tailscale up --accept-dns=falseon other machines in your home network running Tailscale, so they don’t go through Tailscale for DNS queries. We want local DNS queries to stay on our local network, NOT go through Tailscale. We’re also setting up this Pi-hole to only respond to queries from devices outside the home network.
Once you use the command, go to the provided URL and login to connect the machine to your tailnet. Now go to the Tailscale admin console and you should see the machine there.
Next we’ll set up Tailscale on another device we’ll be using outside the home. For a phone or tablet, just go to the app store, download the Tailscale app and open it, then log in to your Tailscale account and tap the Connect button. Pretty easy. Open the Tailscale app and you’ll see a list of the machines on your Tailnet, and their connection status.
To install Tailscale on a laptop, see this page for how to download and install it on your OS.
Set up Pi-hole
We’ll assume you’re setting up Pi-hole for the first time, though if you already have it up and running, you can skip this part and move on to configuration.
Installing Pi-hole bare metal is done in one command that executes an install script.
curl -sSL https://install.pi-hole.net | bash
Follow the prompts during install, but don’t worry about it too much, you can change everything afterwards in the web UI. Note, you can (and should) change your Pi-hole web UI password from the terminal with the command pihole -a -p. You can even leave it blank and skip login.
If you prefer to run Pi-hole as a Docker container, use the following compose.yml (make sure to change password, timezone, volumes, etc.):
services:
  pihole:
    container_name: pihole
    image: pihole/pihole:latest
    ports:
      - 53:53/tcp
      - 53:53/udp
      - 80:80/tcp
    environment:
      TZ: 'America/New_York'
      WEBPASSWORD: 'password'
    volumes:
      - /opt/docker/pihole:/etc/pihole
      - /opt/docker/dnsmasq.d:/etc/dnsmasq.d
    restart: unless-stopped
This is a very basic compose file, there are many environmental variables you can add. When ready, build and run the container with the command:
docker compose up -d
Once Pi-hole is up and running, go to the web UI by going to e.g. http://192.168.0.100/admin. Login (unless you left the password blank) and from the dashboard, go to Settings on the sidebar and go to the DNS tab. Here you can change your upstream DNS servers, if you didn’t set them during install or on the compose file.
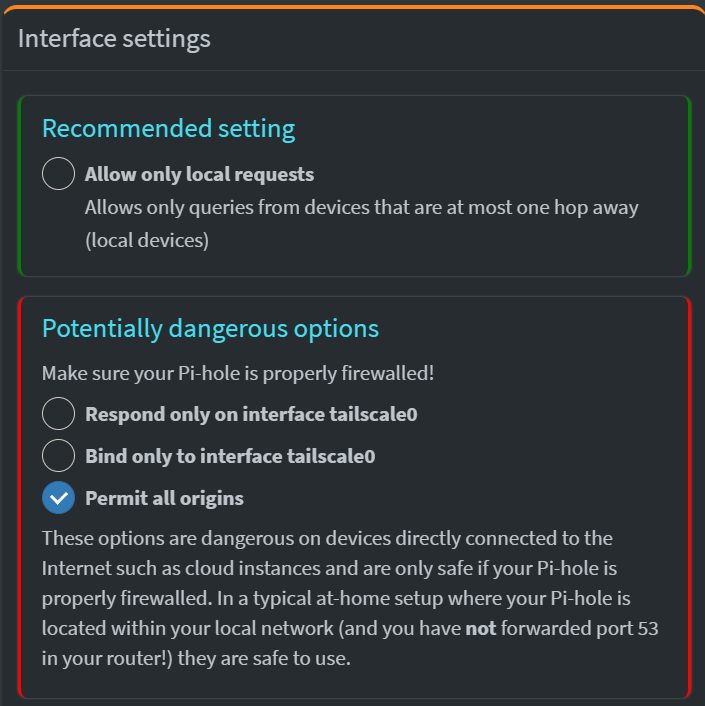
Make sure your upstream DNS server is set (I recommend Quad9 or Cloudflare) and make sure the Interface settings has permit all origins selected.
If using Docker’s default
bridgenetwork setting, permit all origins is required for Pi-hole to work properly. This can also be achieved with the environment variableDNSMASQ_LISTENING: allon the compose file.

Setting a Pi-Hole as Tailnet DNS
By default, Tailscale does not manage your DNS, and each machine on the Tailnet will use it’s own configured DNS settings. Tailscale lets you set a global DNS to be used by all machines when connected to the tailnet, and you can use the public DNS resolvers like Cloudflare or Google.
More importantly for our purposes, you can also use a custom DNS server, including one self-hosted on a server in your network. (As long as it is running Tailscale of course.)
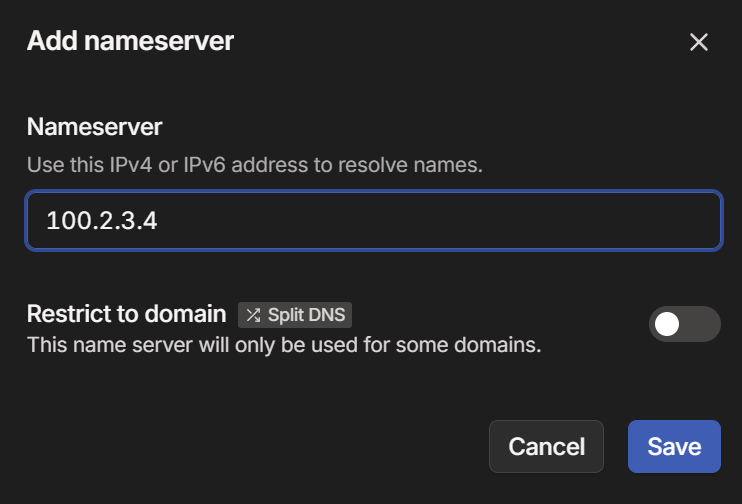
To set the Pi-Hole as global DNS for the tailnet, go to the admin console and make note of the Pi-Hole’s tailnet IP address — it will always begin with 100, for example 100.2.3.4.
Do the following:
-
Go to the DNS tab and scroll down to Nameservers.
-
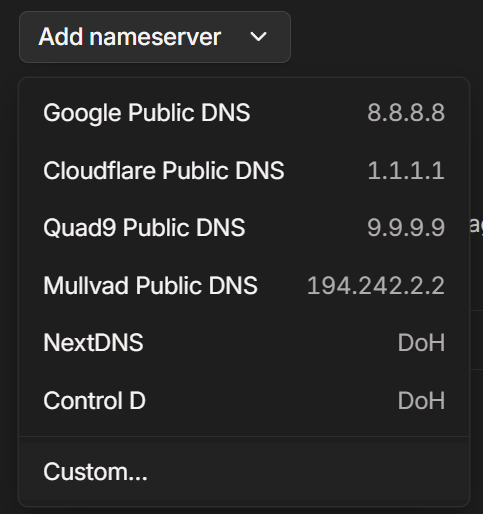
Under Global nameserver click Add nameserver and choose Custom… from the dropdown menu.

- Enter the Pi-Hole’s tailnet IP and click Save.

- Enable the Override local DNS toggle.

Now to test it out, connect to Tailscale on your phone/tablet and visit some websites. You should not be seeing ads and should start seeing the device’s Tailscale IP in Pi-Hole’s logs. Any devices you add to Tailscale will use the Pi-hole we just set up as their DNS server, unless you use the --accept-dns=false flag where available.