Setting up a reverse proxy for HTTPS with a custom domain using Nginx Proxy Manager, Pi-Hole and Cloudflare
I've used a reverse proxy to access my self-hosted apps and services for years, but I recently re-did everything from scratch and decided to write it down. When done, you'll be able to access your apps and services through a custom domain, with unique sub-domains for each app or service, with full HTTPS and accessible only locally.
Table of Contents
This guide is for using Pi-Hole as the DNS server, where we will add the DNS records for your proxied services.
See this other post if you want to use AdGuard Home instead as the DNS server.
Pre-Requisites and Caveats
First of all, this guide uses specific third-party services, namely Cloudflare, Pi-Hole (specifically v6, but older versions will work too) and Nginx Proxy Manager to set up a secure local-only reverse proxy. The same is possible with other tools, apps and services including AdGuard Home or NextDNS instead of Pi-Hole, Caddy or Traefik instead of Nginx, any other DNS provider instead of Cloudflare, etc. I’m only writing about my preferred tools that I’ve used multiple times to set everything up and keep it running for over a year.
This guide will require a owned custom top-level domain (TLD), such as a .com or .cc or .xyz, etc. Certain TLDs can be bought for super cheap on Namecheap or Porkbun, but be aware in most cases after the first year or two, the price will see a steep jump. I again prefer Cloudflare for purchasing domains, since they always price domains at cost, so you won’t see any surprise price hike one year to the next. An alternative I won’t be getting into is using dynamic DNS, as I’ve not had to use it, so I honestly wouldn’t even know how to set that up.
I will be using Pi-Hole as the local DNS server, and I specifically run it bare metal on a Libre Sweet Potato, separate from everything else. If you are running it on the same server as everything else, or in a Docker container, everything should work more or less the same with one caveat — both Nginx Proxy Manager (and any reverse proxy) and Pi-Hole require port 80, but we need to give Nginx precedence here, so I suggest changing the port of Pi-Hole’s web UI from 80 to something else, like 8080.
Setting up Pi-Hole as network DNS server
Pi-Hole can be easily installed bare metal with a bash script or as a Docker container with a compose file. We’ll assume you’re installing Pi-Hole on a separate machine with IP of 192.168.0.50, which will be used in examples.
To install Pi-Hole bare metal use the following command in the terminal:
curl -sSL https://install.pi-hole.net | bash
If you want to run Pi-Hole in a container, use this compose.yaml as a base and edit as necessary:
services:
  pihole:
    restart: unless-stopped
    container_name: pihole
    image: pihole/pihole
    environment:
      - "TZ=America/New_York"
      - "WEBPASSWORD=CHANGE-ME"
      - "FTLCONF_LOCAL_IPV4=192.168.0.50"
      - "DNS1=1.1.1.1"
      - "DNS2=1.0.0.1"
      - "DNSMASQ_LISTENING=all"
      - "DNSSEC=true"
      - "QUERY_LOGGING=true"
    volumes:
      - /opt/docker/pihole:/etc/pihole/
      - /opt/docker/dnsmasq:/etc/dnsmasq.d/
    ports:
      - 53:53/tcp
      - 53:53/udp
      - 80:80/tcp # web UI port
Make sure port
53is available on your server or Pi-Hole will not work!If your Pi-Hole is on the same machine you want to run Nginx Proxy Manager, then you’ll need to change the Pi-Hole web UI port since it is also port
80by default, which will conflict with Nginx Proxy Manager.If you run Pi-Hole in a docker container, simply change the container’s port mapping in the compose file from
80:80to, for example,8888:80.If you are running Pi-Hole bare metal, you need to edit some config files. On Pi-Hole v5 and earlier, edit
/etc/lighttpd/lighttpd.confand change the lineserver.port = 80to your desired port, e.g.server.port = 8888.On Pi-Hole v6, open the file at
/etc/pihole/pihole.tomland find the section# Ports to be used by the webserver. There’s good instructions in the comments here on how it works. Basically, you can comment out the lineport = "80o,[::]:80o,443so, ..."and then write a new line right under it with a different network port — e.g.port = "8888o,[::]:8888o"or something.
I include some presets through environmental variables in the compose file, but customize it as you see fit. Be aware that for Pi-Hole to work properly as a container, you should leave the variable DNSMASQ_LISTENING=all, it’s the same as permit all origins in the Pi-Hole interface settings, which is what you want. When ready, download and run the container with the following command:
docker compose up -d
To ensure all devices on your network use Pi-Hole as their DNS server, you need to set it in your router’s settings. Each router is different, but generally you’re looking for the DNS server settings, usually located within a router’s DHCP settings. If your router lets you set a custom DNS server, enter your Pi-Hole’s IP address here, e.g. 192.168.0.50.
However, not all routers let you set a custom DNS server. If the router does let you turn off it’s DHCP server (this is what hands out IP addresses to network devices) then you can opt to use Pi-Hole as the DHCP, or else manually adding Pi-Hole as the DNS in network settings on a per-device basis. I have no experience using Pi-Hole as the DHCP server, so I won’t explain it further here.
Once the Pi-Hole’s IP is being broadcast as the network’s DNS server by the router, your devices will gradually begin querying Pi-Hole as they renew their DHCP leases. You can usually force a renew by restarting a device, or just reboot the router and it should propagate the changes to all devices.
Next, we’ll add the DNS records in Pi-Hole that we need for Nginx Proxy Manager.
Adding the DNS records in Pi-Hole
Go into the Pi-Hole web UI, it should be accessible via your browser at http://<ip-address>/admin or http://<hostname>/admin if you’re using the default web UI port of 80.
If you changed the web UI port it to something like 8888, it would instead be http://<ip-address>:8888/admin or http://<hostname>:8888/admin.
The below instructions have been updated for Pi-Hole v6.
-
In the Pi-Hole web UI, click on Settings on the sidebar and choose Local DNS Records from the dropdown.
-
Under Local DNS records in the left column, type in the hostname of your server in the Domain field, for example
server. -
In the Associated IP field type in the IP address of the server that will be running Nginx Proxy Manager and all your other containers.
-
Click the blue plus [+] button on the right to add the DNS record.

-
Now in Local CNAME records in the right column, in the Domain field type in your domain with sub-domain, e.g.
plex.domain.com. -
For the Target Domain field type in the hostname you added earlier, for example
server. TTL is optional, just leave it empty. -
Click the blue plus [+] button on the right to add the CNAME record.

Repeat steps 5 through 7 for however many apps or services on that server you want to create CNAME records for, just change the sub-domain for each and keep the same target domain — for example music.domain.com, books.domain.com, etc. You can come back and change these records later as needed.
If you have multiple servers running self-hosted apps or services that you want to reverse proxy, create Local DNS Records for each server, then create CNAME records pointing
service.domain.comat the servers hosting those services.
Once you’re done adding your DNS and CNAME records in Pi-Hole, it’s time to setup Cloudflare to get the TLS certificates for your custom domain.
Add a domain in Cloudflare
You’ll need to create a free account on Cloudflare. (Feel free to use another DNS provider if you prefer.) You can add a domain bought from another registrar to Cloudflare by following the below instructions, or if you purchase a domain on Cloudflare it will automatically be configured and you can skip this section.
To add an existing domain to Cloudflare:
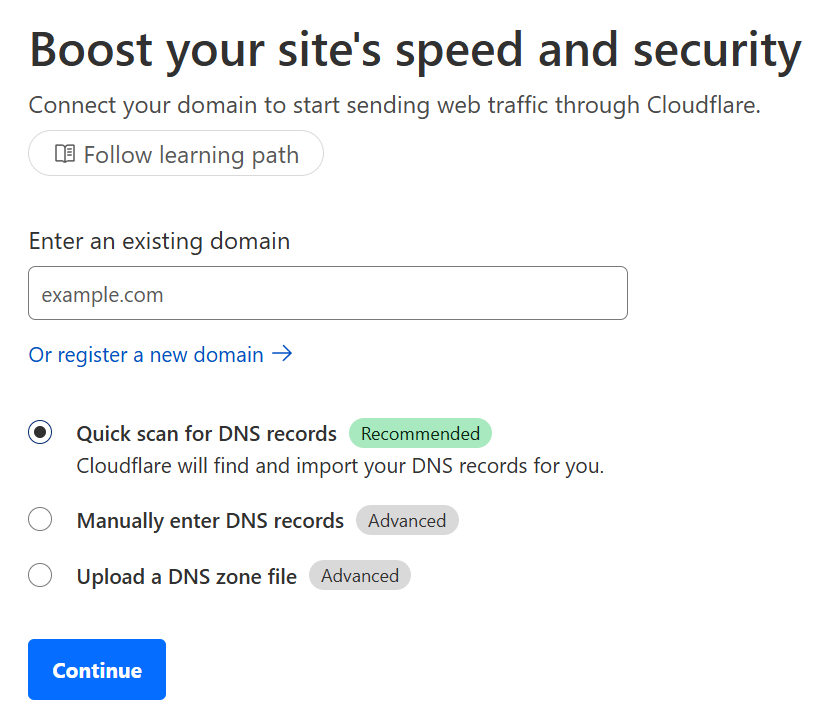
- On the Cloudflare dashboard Account Home, click the + Add a domain button.
-
Enter your domain, leave Quick scan for DNS records selected, and click Cotinue.
-
Click on the Free plan at the bottom and click Continue.

- You’ll see your DNS records, if there are any. Don’t worry about this right now and click on the Continue to activate button.
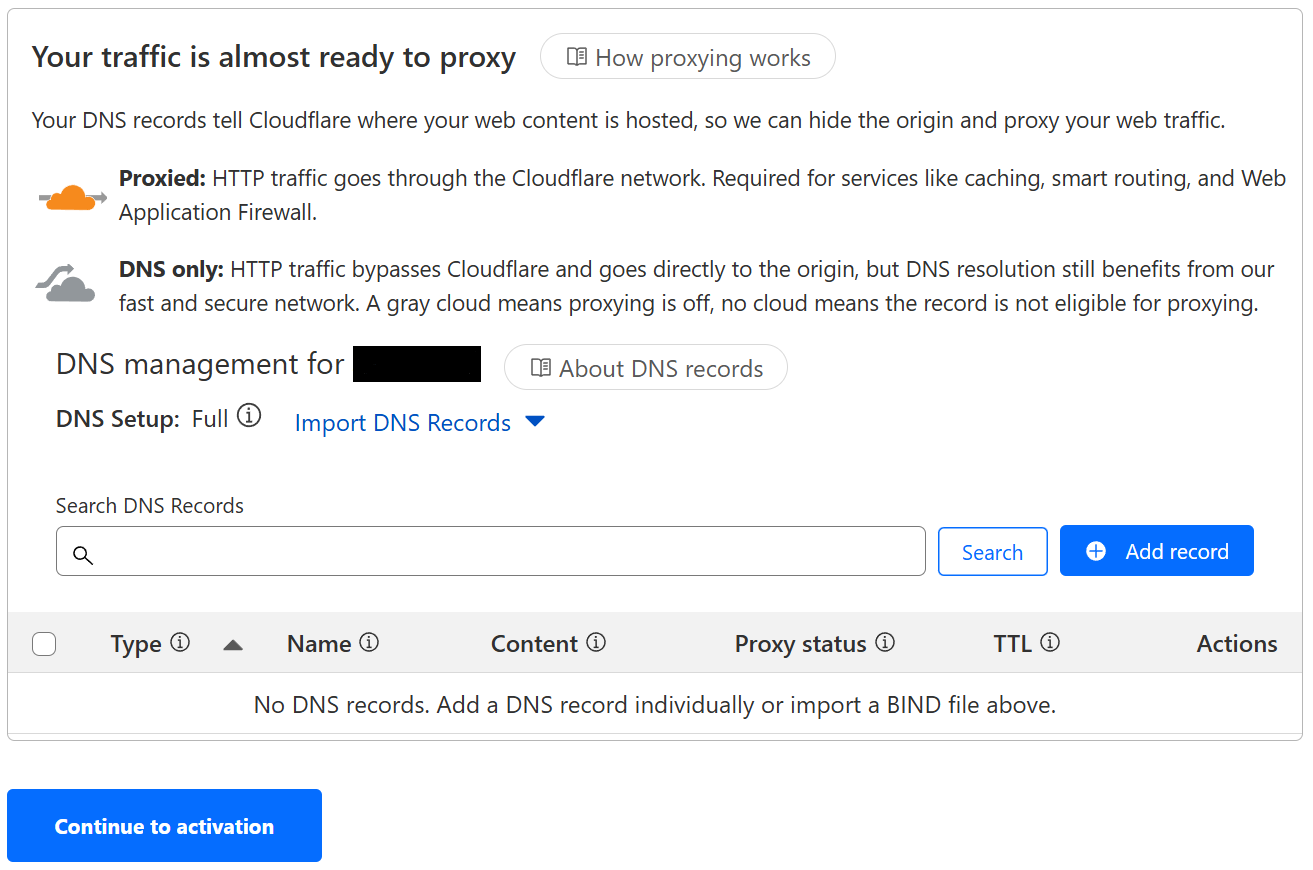
- You’ll see a pop-up window saying you should set your DNS records now, click on Confirm.

-
You’ll be provided some instructions to update the nameservers on your domain’s registrar, open a new tab and follow those instructions. Once you’ve added the Cloudflare nameservers at your registrar, go back to Cloudflare and click on Continue.
-
Now you’ll have to wait a few minutes for the changes to propagate, then click on Check nameservers and reload the page. If it’s still shows Pending next to the domain at the top, just keep waiting. In the meantime, we need to do some additional setup.
-
From your domain’s Overview scroll down and you’ll see a section at the bottom-right called API with a Zone ID and Account ID. Under that, click on Get your API token.
-
Click the Create Token button. The first template should be Edit zone DNS, click the Use template button next to it.

-
Under Permissions, leave the first entry as is, click on + Add more.
-
For the new Permission, choose in order from the dropdown menus Zone, Zone and Read.

- Under Zone Resources, leave the first two dropdown menus as is, and in the final dropdown all the way to the right, select your domain. Scroll past everything else,without changing anything else, click on Continue to summary, and finally on the Create Token button.

-
On the next page you’ll see your API token, make sure to save it somewhere because it will not be shown again. We will need this API token to provision the TLS certificates in Nginx Proxy Manager.
-
Once your domain is Active in Cloudflare, you can move on to the next section.
Install and congifure Nginx Proxy Manager
If you don’t have Docker installed already and need to do from scratch, I suggest using Docker’s own bash script to do so by running the command curl -fsSL get.docker.com | sudo sh. I’ll be using docker compose to install and run Nginx Proxy Manager, it’s the easiest way to run long-term containers.
Create a compose.yaml file, use the below as a base. (If you are also running Pi-Hole as a container, I’d suggest putting them both on one compose file.)
services:
  nginx-proxy-manager:
    container_name: nginx-proxy-manager
    image: "jc21/Nginx-proxy-manager:latest"
    ports:
      - 81:81 # web UI port
      - 80:80
      - 443:443
    volumes:
      - /opt/docker/nginx:/data
      - /opt/docker/letsencrypt:/etc/letsencrypt
    restart: unless-stopped
This compose file uses bind mounts to store container data in specific directories on the host, as I find this easier to migrate than volumes. Be sure to type in your own local path to where you want the data from Nginx Proxy Manager to live in your server, e.g. /home/bob/docker/.. etc.
Now run the command docker-compose up -d (using the -d flag has it run in the background as a daemon) within the same directory where the compose file is located to create the container.
If you are running Portainer and want to create the container(s) from within it’s UI — rather than creating the compose file and using commands in the terminal — do the following:
-
In the Portainer UI, go into your environment and click Stacks from the sidebar.
-
Click the + Add Stack button at the top-left. Name the stack, copy and paste the contents of the
compose.yamlabove into the web editor. -
Once done, scroll down and click the Deploy the stack button.
Whichever method you use, wait a few moments while the image is downloaded and the container is created. Once it’s up and running (you should not encounter any issues as long as ports 53, 80 and 443 are not in use by another service) we can login to the Nginx Proxy Manager web UI at http://<ip-address>:81 where the IP is the server running Nginx Proxy Manager.
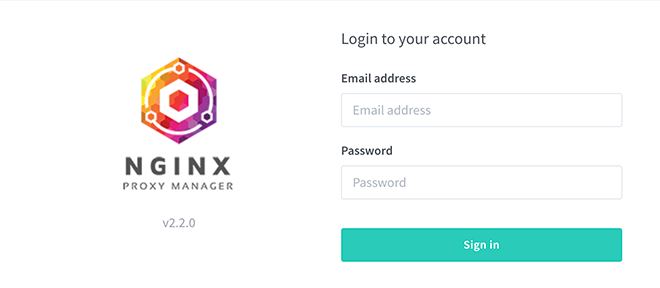
Go into the Nginx Proxy Manager web UI at http://<your-ip-address>:81, login with the default email [email protected] and password changeme, and as soon as you login go to Users on the nav bar, and change (ideally) both the email and password of the administrator account.
To add proxy hosts click on Hosts on the navigation bar at the top, then click the Add Proxy Host button.
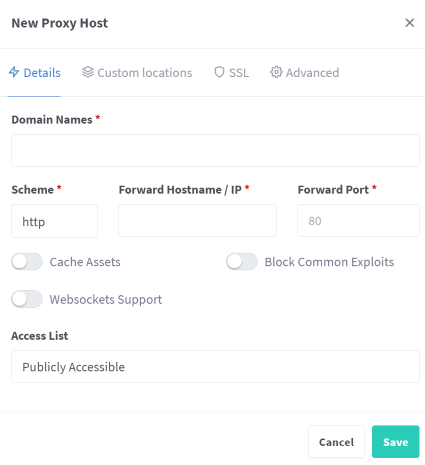
We’ll create an entry for Plex first, which is running as a container on the same host at port 32400. You’ll begin in the Details tab.
-
Under Domain Names type in
*.domain.comand click theAdd *.domain.comdropdown that appears. Make sure to include the*as this will create a wildcard certificate for use with all subdomains. -
Leave Scheme as
http. -
For Forward Hostname/IP type in your server IP.
-
For Forward Port type in
32400. -
Toggle on Websockets Support and Block Common Exploits, but leave caching off.
-
Go to the SSL tab, click under SSL Certificate and select Request a new SSL Certificate from the dropdown.
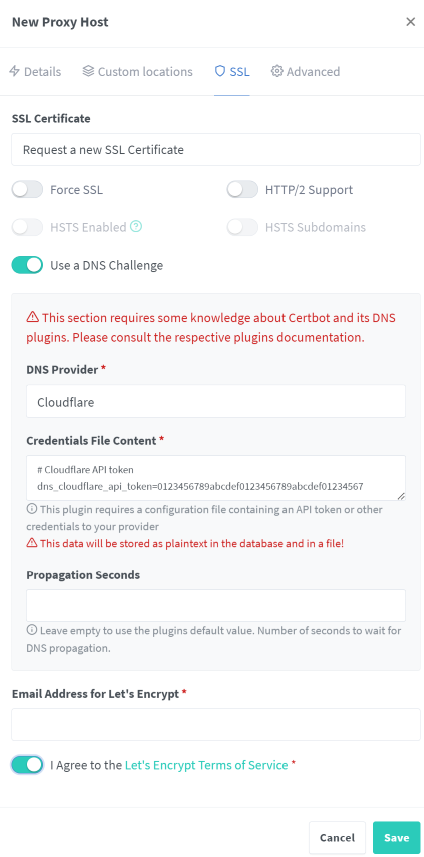
-
Leave Force SSL toggled off, but feel free to toggle it on if you prefer.
-
Toggle on Use a DNS Challenge, then under DNS Provider choose
Cloudflarefrom the dropdown. -
Under Credentials File Content you’ll see see
dns_cloudflare_api_token=followed by numbers. Replace these numbers with your Cloudflare API token. -
At the bottom, type an email address (you’ll get emails when your certificate is about to expire), toggle on that you agree to the Let’s Encrypt TOS, and click Save.
Assuming you set up and entered your Cloudflare API token correctly, after a minute or two an SSL certificate will be provisioned and the proxy host will be created. Now you should be able to go to https://plex.domain.com and see your Plex UI with full HTTPS.
To add additional proxy hosts, repeat the process as above (changing the forward port to the one used by each specific app you are proxying), but when you get to the SSL tab choose your now existing *.domain.com certificate from the dropdown, then proceed to choose Cloudflare as DNS provider and enter the API token. This process has to be done each time you add a new proxy host.
Always make sure the full URL you want to use (subdomain.domain.com) is added to the CNAME Records in Pi-Hole (or whatever DNS server you use in your home network) pointing to the server running Nginx Proxy Manager as target.
If something does not work as intended (503 error or the like), fiddle with the proxy host options — try both http and https scheme, try toggling Force SSL on and off, double-check your API token is correct, etc. You can also check the Nginx Proxy Manager container logs with the terminal command docker logs nginx-proxy-manager. (Or whatever container_name you used in the compose file when creating the container.)
Barring any errors, once you set up all your proxy hosts in Nginx Proxy Manager you should have full HTTPS when going to your services via https://subdomain.domain.com, with one exception — Pi-Hole requires a little extra configuration, so let’s do that.
Accessing Pi-Hole web UI with HTTPS
The below instructions have been updated for Pi-Hole v6. However, the instructions for v5 and earlier are further down if you need them.
Pi-Hole v6 supports accessing the web UI with HTTPS out-of-the-box. If you didn’t make any changes to the network port in /etc/pihole/pihole.toml, then you just need to create an entry in Nginx Proxy Manager as per usual, same as the instructions above.
-
Go to the Nginx Proxy Manager web UI and create a new proxy host.
-
For Domain Names type in the URL you want to use, e.g.
pihole.domain.com. -
Leave the Scheme as
http, and type in your Pi-Hole server’s IP address under Forward Hostname/IP. -
For the Forward Port, you want to use
80if you didn’t make any changes to Pi-Hole web UI port. If you changed it, use that port here instead. -
Follow the rest of the instructions above to generate the TLS certificate for
pihole.domain.com. -
Once it’s done, go to
https://pihole.domain.com/admin(you’ll get a 403 error without the/adminpath, but we’ll fix this below) and you should be able to access the web UI with HTTPS.
If you CANNOT access the web UI with
httpsin the URL, try insteadhttp://pihole.domain.com/adminand click past the warning. After that it should work as per usual by going tohttps://pihole.domain.com/admin.
One last thing! You can easily set an automatic redirect from pihole.domain.com/ to pihole.domain.com/admin so that you don’t get the 403 error by going to the domain’s root.
-
Go to Settings on the sidebar and choose All settings from the dropdown.
-
Click on Webserver and API, then under webserver.domain replace the Value of
pi.holewithpihole.domain.com. -
Click on the Save & Apply button at the bottom.
Now you should automatically be redirected to the Pi-Hole dashboard at /admin when you go to https://pihole.domain.com/.
Accessing the web UI with HTTPS in Pi-Hole v5
To be clear, the method I’m about to describe comes from this question and answer on the Pi-Hole discourse, it is the only method that has ever worked for me.
-
Go to the Pi-Hole web interface, and go to Local DNS records -> CNAME records on the sidebar. Enter the domain you want to use, e.g.
pihole.domain.comand for Target Domain use the hostname or IP address of the server running Nginx Proxy Manager. -
SSH into the Pi-Hole terminal and create a new file at
/etc/lighttpd/conf-enabled/15-pihole-custom-admin-redirect.conf, then copy and paste the code below:
$HTTP["url"] == "/" {
    $HTTP["host"] == "pihole.domain.com" {
         url.redirect = ("" => "/admin/")
    }
}
-
Save the file and run the command
sudo service lighttpd restartfor the newly created config file to take effect. -
Go to Nginx Proxy Manager and create the proxy host for
pihole.domain.comas normal, but make sure under Forward Hostname/IP to enter the hostname/IP of the machine running Pi-Hole and under Forward Port enter80. Do everything as normal in the SSL tab too.
Once you’re done setting up the proxy host, you should be able to go to https://pihole.domain.com, be automatically forwarded to the /admin page and have full HTTPS on the web UI.