Set up Pi-Hole for network-wide ad blocking and Unbound for recursive DNS (Updated for Pi-Hole v6)
Besides just using a browser extension for ad blocking, I've been using Pi-Hole for years to prevent all devices on my network from getting ads, and stopping smart home devices from phoning home for telemetry and tracking. Pi-Hole will run on almost anything that can run Linux, is very easy to set up, and super effective with the right blocklists.
Table of Contents
- Pre-Requisites and Caveats
- Installing Pi-Hole
- Installing Unbound
- Running Pi-Hole and Unbound together on Docker
- Configuring DNS
- Adding blocklists and allowlists
- Updating Pi-Hole
- Export or import Pi-Hole configuration
- Use local time instead of UTC
- Accessing Pi-Hole web UI with HTTPS
- Fixing the Certificate Domain Mismatch warning
- Run and sync two Pi-Holes
- References
Pre-Requisites and Caveats
Before anything, make sure the machine you’re installing Pi-Hole on has a static IP, otherwise if your machine’s IP changes it will break DNS resolution for the network. You can set a static IP on the server itself or else use IP Reservation on your router.
In addition, Pi-Hole will run a web server — as of Pi-Hole v6, the web server will default to port 80 if available, otherwise it will attempt to run the web server on port 8080. As a result, make sure one of those ports are available for Pi-Hole’s web UI.
When installing Pi-Hole on Ubuntu (at least Pi-Hole v5, I don’t know if this still happens on v6) you may get an error message along the lines of this:
Error starting userland proxy: listen tcp4 0.0.0.0:53: bind: address already in use
This is because Pi-Hole includes dnsmasq which binds to port 53, but Ubuntu by default uses systemd-resolved on that port. If this happens, you’ll need to disable systemd-resolved prior to installing Pi-Hole.
sudo systemctl stop systemd-resolved
sudo systemctl disable systemd-resolved.service
Then edit the file at /etc/resolv.conf and change nameserver 127.0.0.53 to nameserver 9.9.9.9 (or whatever public DNS you prefer) to not break DNS resolution. Afterwards use dig google.com or ping google.com to verify DNS is still working, then proceed with installing Pi-Hole.
Alternately, you may already have another DNS server like Unbound running on port 53. If so, it needs to be disabled for now — we will create a new configuration file for Unbound to run alongside Pi-Hole, and it will not use port 53.
If you’re running Unbound, disable it with the following command:
sudo systemctl stop unbound.service
Installing Pi-Hole
This is for installing Pi-Hole bare metal, so if you want to run it in Docker, skip to this section.
The quickest and easiest way to get Pi-Hole up and running bare metal is via their official installer. We’ll use the following command to execute it:
curl -sSL https://install.pi-hole.net | bash
Installation will prompt a number of dialogs, pay attention and make sure you input all the correct information or to the best of your knowledge. (You can change it later.)
A random password will be generated during install for logging in to the Pi-Hole web UI. You should change the admin password with
pihole -a -p <password>(on Pi-Hole v5) orpihole setpassword <password>(on Pi-Hole v6).If you prefer, you can leave the password blank and bypass login with
pihole -a -porpihole setpassword. (Don’t include a password when using the commands to set it as blank.)
Pi-Hole v6 defaults to using port 80 for the web UI, so you should be able to access it via either IP address (http://192.168.1.250/admin) or using the machine hostname (http://hostname/admin). If port 80 is unavailable, Pi-Hole will automatically try to use port 8080 instead. Keep this in mind if you already have anything running on either port 80 or 8080 when installing Pi-Hole.
To set a custom network port for the Pi-Hole web UI, edit the configuration file at /etc/pihole/pihole.toml. Find the [webserver] block, under it there’s comments explaining how it works.
Basically, you can change or comment out the line port = "80o,443os,[::]:80o,[::]:443os" and then write a new line right under it with a different network port — e.g. port = "8888o,[::]:8888o" or something. (Personally I’d rather change something else’s port to use 80 and 443 in Pi-Hole, but that’s just me.) Save the file and close it, then you should be able to access the Pi-Hole dashboard at the new port, e.g. http://192.168.0.250:8888/admin, etc.
Installing Unbound
Running Unbound alongside Pi-Hole v6 is identical to Pi-Hole v5. Again, I’ll be explaining how to install Unbound bare metal, so if you want to run it in Docker instead, skip to this section.
Unbound is available on most, if not all, Linux package managers and should be installed that way whenever possible. On Debian and Ubuntu, for example, you’d install with this command:
sudo apt install unbound
As per the official docs, we’ll create a configuration file located at /etc/unbound/unbound.conf.d/pi-hole.conf with the below contents:
server:
    verbosity: 0

    interface: 127.0.0.1
    port: 5335
    do-ip4: yes
    do-udp: yes
    do-tcp: yes
    do-ip6: no

    prefer-ip6: no
    harden-glue: yes
    harden-dnssec-stripped: yes
    use-caps-for-id: no
    edns-buffer-size: 1232
    prefetch: yes
    num-threads: 1
    so-rcvbuf: 1m

    private-address: 192.168.0.0/16
    private-address: 169.254.0.0/16
    private-address: 172.16.0.0/12
    private-address: 10.0.0.0/8
    private-address: fd00::/8
    private-address: fe80::/10
Unbound should already be running when you installed it, let’s restart it so the new config takes effect, and test that it’s working:
sudo service unbound restart
dig pi-hole.net @127.0.0.1 -p 5335

;; global options: +cmd
;; Got answer:
;; ->>HEADER<<- opcode: QUERY, status: NOERROR, id: 58337
;; flags: qr rd ra; QUERY: 1, ANSWER: 1, AUTHORITY: 0, ADDITIONAL: 1

;; OPT PSEUDOSECTION:
; EDNS: version: 0, flags:; udp: 1232
;; QUESTION SECTION:
;pi-hole.net.                   IN      A

;; ANSWER SECTION:
pi-hole.net.            300     IN      A       3.18.136.52

;; Query time: 60 msec
;; SERVER: 127.0.0.1#5335(127.0.0.1) (UDP)
If your output looks similar to the above, then everything is working as intended.
Running Pi-Hole and Unbound together on Docker
I have not run Pi-Hole v6 in Docker as of yet, so be aware that if there’s any differences between v5 and v6, they are not included below. An update to this section will be forthcoming, if necessary.
I always run Pi-Hole bare metal as a personal preference, so I’ll be giving instructions for something I haven’t used myself. Maybe I’ll spin up some containers and test it out, but for now… let me know how it goes.
I’m going to suggest using Chris Crowe’s project for running both Pi-Hole and Unbound either in one or two containers.
This compose.yaml should get you going as a starting point:
volumes:
  etc_pihole-unbound:
  etc_pihole_dnsmasq-unbound:

services:
  pihole:
    container_name: pihole
    image: cbcrowe/pihole-unbound:latest
    hostname: pihole
    ports:
      - 443:443/tcp
      - 53:53/tcp
      - 53:53/udp
      - 8800:80/tcp
      - 5335:5335/tcp
      - 22/tcp
    environment:
      - FTLCONF_LOCAL_IPV4=192.168.0.250
      - TZ=America/New_York
      - WEBPASSWORD=changeme
      - PIHOLE_DNS_=127.0.0.1#5335
      - DNSSEC="true"
      - DNSMASQ_LISTENING=all
    volumes:
      - etc_pihole-unbound:/etc/pihole:rw
      - etc_pihole_dnsmasq-unbound:/etc/dnsmasq.d:rw
    restart: unless-stopped
I’ve never really run Unbound in a container, even when using Pi-Hole in a container I just run Unbound bare metal. That said, you can try it out and let me know if these instructions work or not.
Here is a compose.yaml to run Pi-Hole and Unbound containers together:
networks:
  dns_net:
    driver: bridge
    ipam:
      config:
        - subnet: 10.1.1.0/16

services:
  pihole:
    container_name: pihole
    hostname: pihole
    image: pihole/pihole:latest
    networks:
      dns_net:
        ipv4_address: 10.1.1.2
    ports:
      - "53:53/tcp"
      - "53:53/udp"
      - "67:67/udp"
      - "8000:80/tcp"
      - "4430:443/tcp"
    environment:
      - 'TZ=America/New_York'
      - 'WEBPASSWORD='
      - 'DNS1=10.1.1.3#53'
      - 'DNS2=no'
    volumes:
      - './etc-pihole/:/etc/pihole/'
      - './etc-dnsmasq.d/:/etc/dnsmasq.d/'
    cap_add:
      - NET_ADMIN
    restart: unless-stopped

  unbound:
    container_name: unbound
    image: mvance/unbound:latest
    networks:
      dns_net:
        ipv4_address: 10.1.1.3
    volumes:
      - '/opt/docker/unbound:/opt/unbound/etc/unbound'
      - '/opt/docker/unbound/pihole.conf:/opt/unbound/etc/unbound/pihole.conf'
    ports:
      - "5053:53/tcp"
      - "5053:53/udp"
    healthcheck:
      disable: true
    restart: unless-stopped
Configuring DNS
If running in Docker using the above instructions, this should already be setup, but you can double-check it to be safe.
If running bare metal, we need to make Unbound the upstream DNS resolver for Pi-Hole. In the Pi-Hole web UI, go to Settings on the sidebar, then click on the DNS from the dropdown.
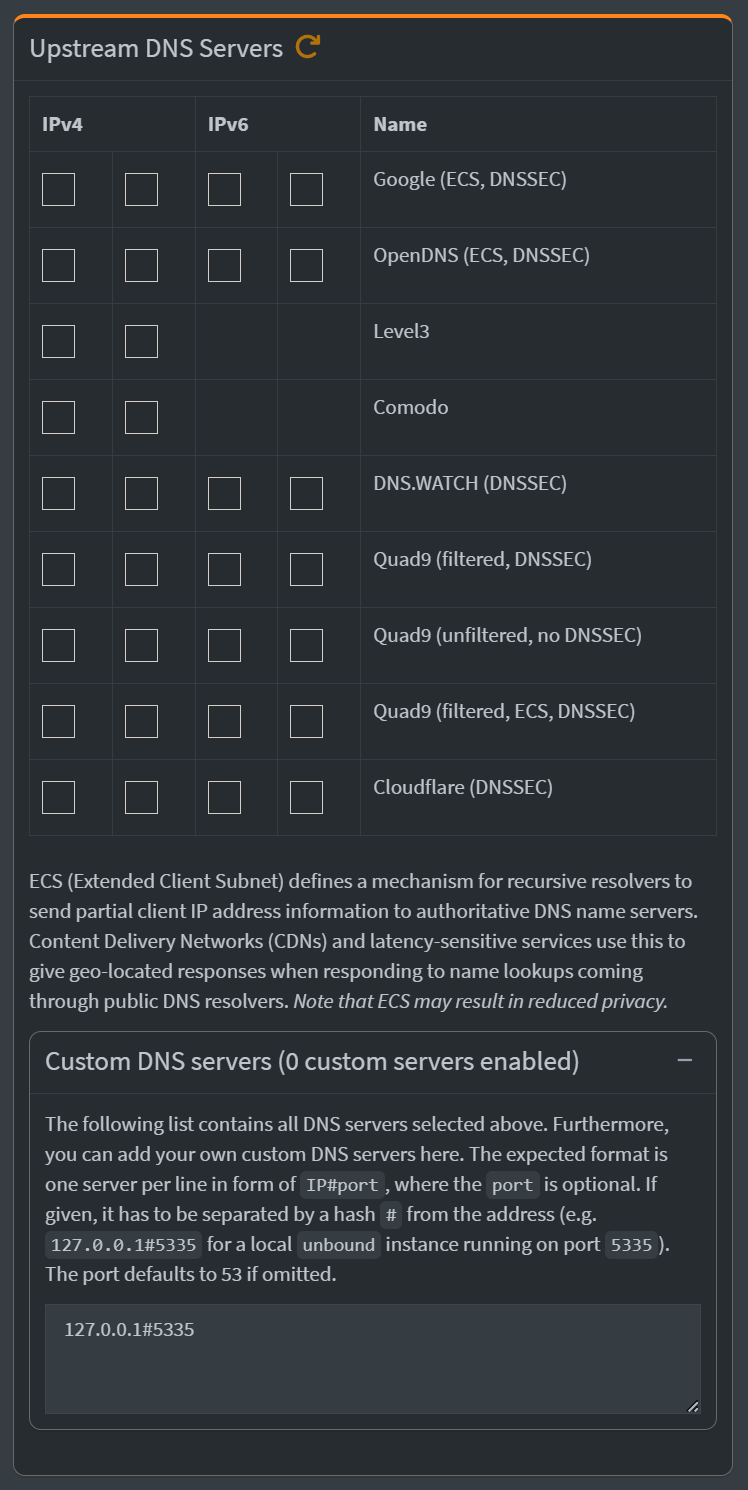
Under Upstream DNS Servers, uncheck any checkmarked DNS servers, then click on Custom DNS servers and type in 127.0.0.1#5335 as the server. (On Docker, you instead want to type in the machine IP, e.g. 192.168.0.250#5335.)
Scroll down to the bottom and click on Save & Apply.
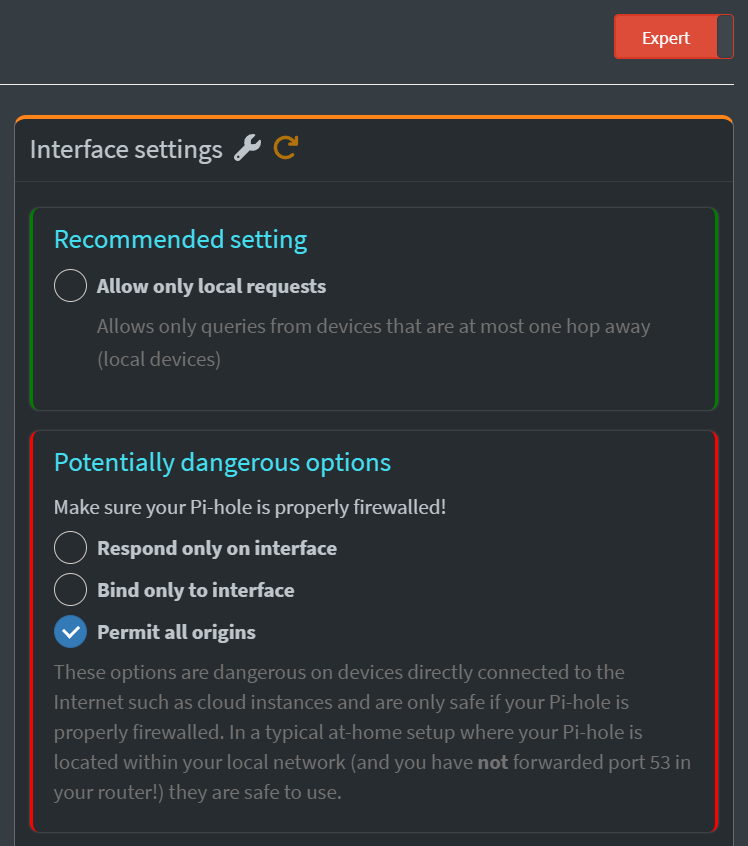
Next, click on the Basic slider at the top-right so it switches to Expert. This will make additional settings and options appear.
Make sure under Interface settings you have picked Permit all origins. Don’t worry about this being “potentially dangerous,” as long as the machine running Pi-Hole is not accessible from the internet — and especially port 53 is not exposed — then this is totally safe and will ensure Pi-Hole receives and answers queries from every device in your network.
Next, in order for Pi-Hole to work network-wide for all devices (including phones and tablets on Wi-Fi), you’ll need to configure your router to use the Pi-Hole server as DNS. Some routers do not let you change this setting, like AT&T’s Arris BGW210-700, but most Netgear and TP-Link routers do.
If the option is available, it’s usually under DNS Servers in DHCP Settings, change whatever IP address is there to your Pi-Hole’s IP, and your router will begin handing out Pi-Hole as the network-wide DNS when clients renew their DHCP leases.
If your router does not have the option of setting a DNS server, you won’t be able to block ads for all devices on your network automatically. Instead you’ll have to configure each device’s DNS or turn off DHCP on your router (if possible) and use Pi-Hole as the DHCP server.
You should now be set up for Pi-Hole to be the DNS server for your whole network. If you added Pi-Hole’s IP address as the DNS server in your router, devices will gradually begin querying Pi-Hole as they renew their DHCP leases and get the updated DNS server.
Otherwise you add Pi-Hole’s IP manually to each device’s DNS settings. As Pi-Hole starts answering DNS requests from clients, it will build up a cache — domain resolution will start slow, but once they are cached Pi-Hole should be even faster than a public DNS.
Next, you’ll notice the Pi-Hole web UI will show all clients as IP addresses, but there’s a few methods to show hostnames instead. (Or hostname.domain if you prefer.) The easiest way is to use Conditional Forwarding, though it seems to be an uncommon feature with most consumer-grade routers, so don’t be surprised if it doesn’t work for you.
Go to Settings on the sidebar, click on the DNS tab, set the slider to Expert, and scroll down to Conditional Forwarding at the bottom.
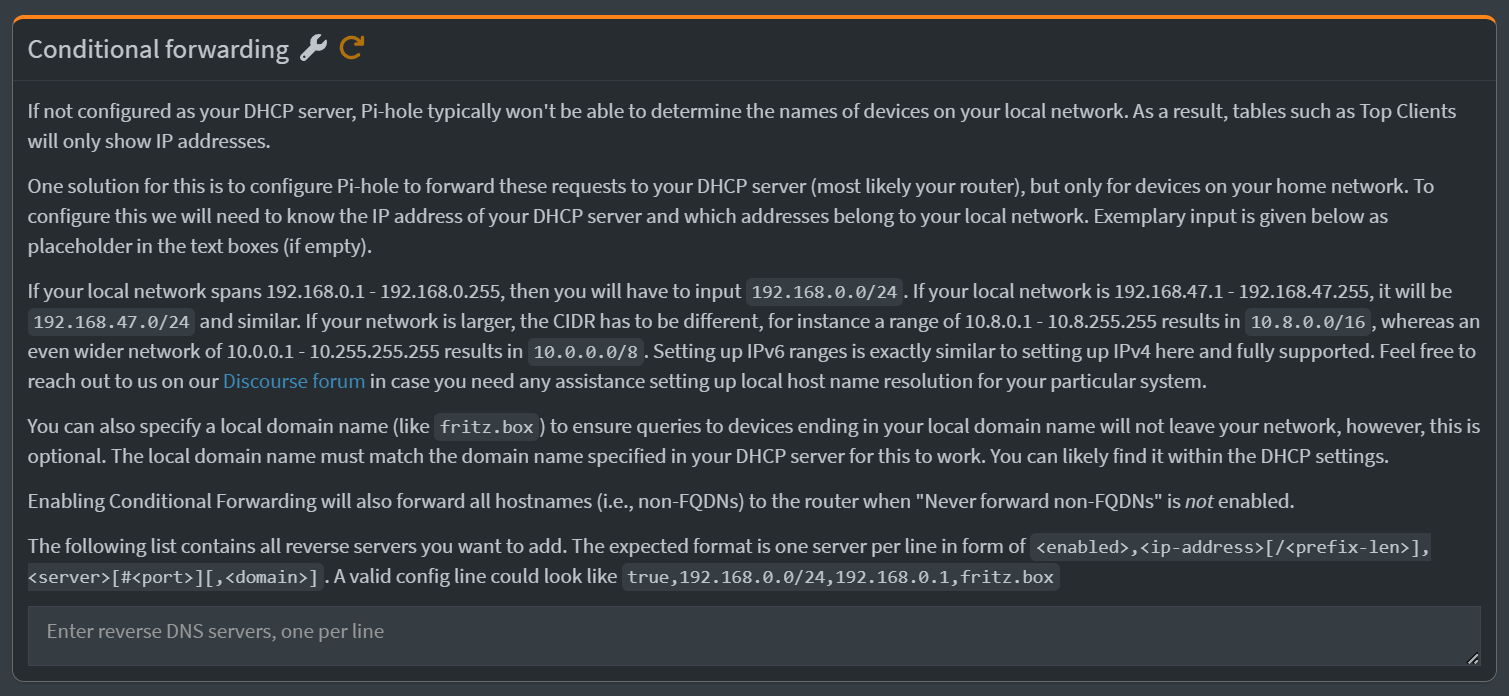
Be sure to read this and figure out what pertains to your situation. In most cases you’ll need to type in your subnet (most likely 192.168.0.0/24 or 192.168.1.0/24, etc.), type in the domain if your router uses one and you know what it is (e.g. .local or .home) otherwise leave it blank, and click Save & Apply.
Check the dashboard and see if that’s enough to display hostnames instead of IP addresses. If the hostnames are not showing up, there’s something else we can try. Go back to Settings -> DNS and set the slider to Expert to see Advanced DNS settings and you’ll see checkmarks like in the picture below.
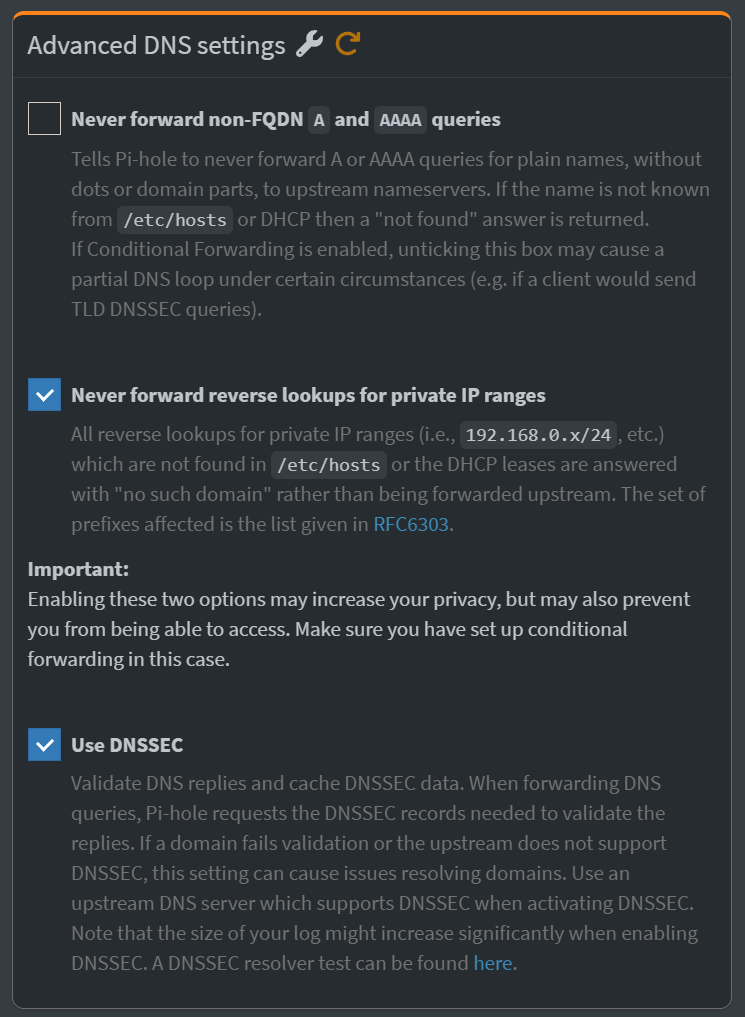
For the best security, both of these should be checked, but you can try unchecking one or both to see if they make the hostnames show. If the hostnames still don’t populate, it’s likely your router simply does not support conditional forwarding.
In that case, you’ll have to manually add each device’s IP address and hostname/domain. Go to Settings -> Local DNS Records on the sidebar. Here, type in a Domain (or hostname) and Associated IP, then click the plus [+] button.

Alternately, you can manually edit the /etc/hosts file on the server running Pi-Hole. You can bind an IP to a hostname, domain or any other alias.
# /etc/hosts

192.168.0.100   server
192.168.0.200   pc
192.168.0.230   laptop
192.168.0.245   mydomain.tld
Adding blocklists and allowlists
Pi-Hole blocks ads by checking DNS queries against blocklists, most of which are curated by the community. Until blocklists are added, no ads are being blocked. On the flipside, you can use allowlists tell Pi-Hole that particular domains should NOT be blocked, even if they appear in blocklists.
Blocklists and Allowlists are just a bunch of domains (see below) that Pi-Hole will either block or ignore, so make sure add them as the right kind of list! If you add a blocklist as an allowlist, you’ll be telling Pi-Hole to allow a bunch of bad domains to have their way with you. Likewise adding an allowlist as a blocklist instead will cause bad things to happen.
On the Pi-Hole web UI, click on Lists on the sidebar. Here you can type in the URL to a blocklist, or type an individual URL, or multiple comma-separated URLs, then click on Add blocklist or Add allowlist, depending on what you want Pi-Hole to do with those URLs.

Once you’ve added any Lists (and any time you add additional ones), make sure to update your gravity for the changes to take effect. Go to Tools on the sidebar and click on Update Gravity on the dropdown.
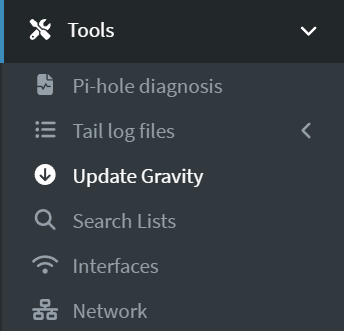
You’ll be taken to a separate page, click on the big Update button to begin, and do not leave or reload the page until the process is done!
Pi-Hole does not technically ship with any blocklists, but you do have the option to add Steven Black’s unified hosts list during bare metal install of Pi-Hole. This list will have around 127,000 of the most egregious ad-serving domains, but by itself it will not cover much. You’ll have to add additional blocklists yourself.
Here are some curators of blocklists that, after many years of using Pi-Hole, I’ve come to trust and always add to Pi-Hole. (Or AdGuard Home, or NextDNS, etc.)
- The Firebog (the green lists are best)
- Hagezi’s DNS blocklists (there are many to choose from!)
- The Block List Project
- Developer Dan’s Adlists
- 1Hosts (I suggest Lite or Pro)
- OISD
- This gist of Regex Expressions
After adding some blocklists from the above links, you may end up with several million “Domains on Lists” as shown in the dashboard. It’s all good. (Note this is all domains from blocklists and allowlists combined.)
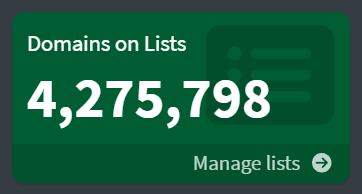
If you set the Pi-Hole as DNS on the router, and restarted the router, then you should see your dashboard stats explode with requests soon enough, especially from mobile devices. (If you didn’t do that, manually configure some devices to use Pi-Hole as the DNS to start populating the dashboard. You may have to restart those devices for them to start using Pi-Hole as their new DNS server.)
Pay attention to any issues you have visiting websites, using online apps and streaming services, etc. Check your Query Log and if you see anything that shouldn’t be blocked, click on the Allow button to whitelist that individual domain. Likewise if you notice anything being allowed that you’d rather block, click on the Deny button to block that individual domain.
If you feel the need, look up some Allowlists to add common domains that Pi-Hole should ignore. Personally, I keep my own small allowlist and just click “allow” on individual domains from the query log as needed, but if you wanted a curated Allowlists, check these out:
- HaGeZi’s Allowlist (unblocks affiliate & tracking referral links that appear in mails, search results etc.)
- anudeepND’s whitelist (hasn’t been updated in years, but some good stuff in there, and works in v6 as an allowlist — see here)
- hl2guide’s AdGuard Home whitelist (works on Pi-Hole as well, but no longer maintained as of Jan 2025)
Updating Pi-Hole
When an update to Pi-Hole, FTL and/or the Web Interface is available, you can easily update your bare metal Pi-Hole in the terminal by using the command pihole -up. Pi-Hole will not update on it’s own, so you have to do it manually, and the Pi-Hole team does not recommend automating it. (Though you can, if you so choose.)
If you’d rather update Pi-Hole during off-hours, like in the middle of the night, I suggest using at — it lets you use schedule a one-time task for a later time, similar to cron but non-recurring or automated. (The syntax for at is also more human-readable than cron.) For example, the below command will schedule pihole -up to be executed at 5:00 AM:
pihole -up | at 5AM
Export or import Pi-Hole configuration
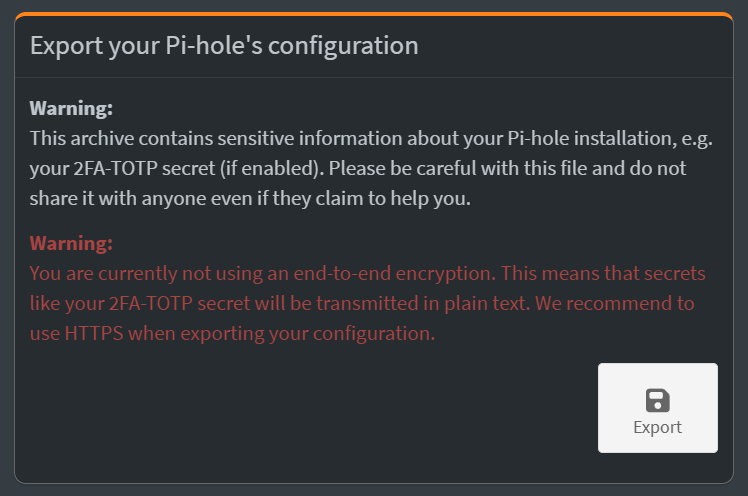
You may want to regularly create a backup of your Pi-Hole configuration. You can’t automate it, but that’s ok because it’s very simple — just to go the web UI, click on Settings -> Teleporter, and click the Export button to download your configuration. This will download a compressed file to the device you’re accessing the web UI from. (Note: The warning seems to come up even when using HTTPS, so just ignore it.)
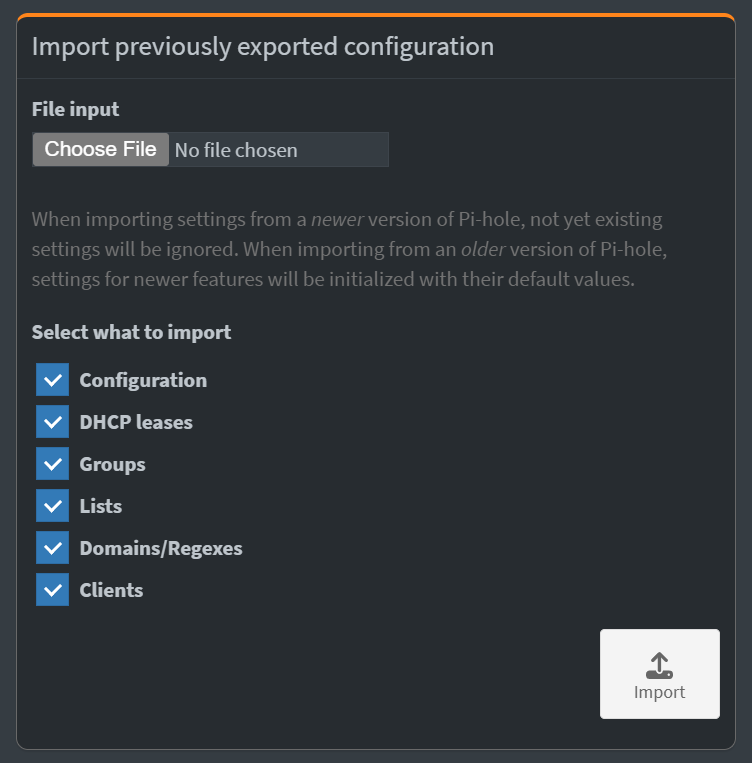
From within this same screen you can import a previously exported configuration. Click on Choose file and navigate to the config on your device, then checkmark the settings you want to import, and click the Import button.
Use local time instead of UTC
If you notice the query log displaying times as UTC instead of your local time zone, and you want the logs to use your time zone, use (for example if you want to set EST time zone):
sudo timedatectl set-timezone America/New_York
If you want to find out your time zone in the tz database, see here.
Accessing Pi-Hole web UI with HTTPS
Pi-Hole v6 supports accessing the web UI with HTTPS out-of-the-box. I wrote a full blog post about setting up a reverse proxy with Nginx Proxy Mananger and using Cloudflare for the DNS challenge to provision the TLS certificate. The pertinent section is here, but assuming you already know how to work with Nginx Proxy Manager, here is a quick guide:
-
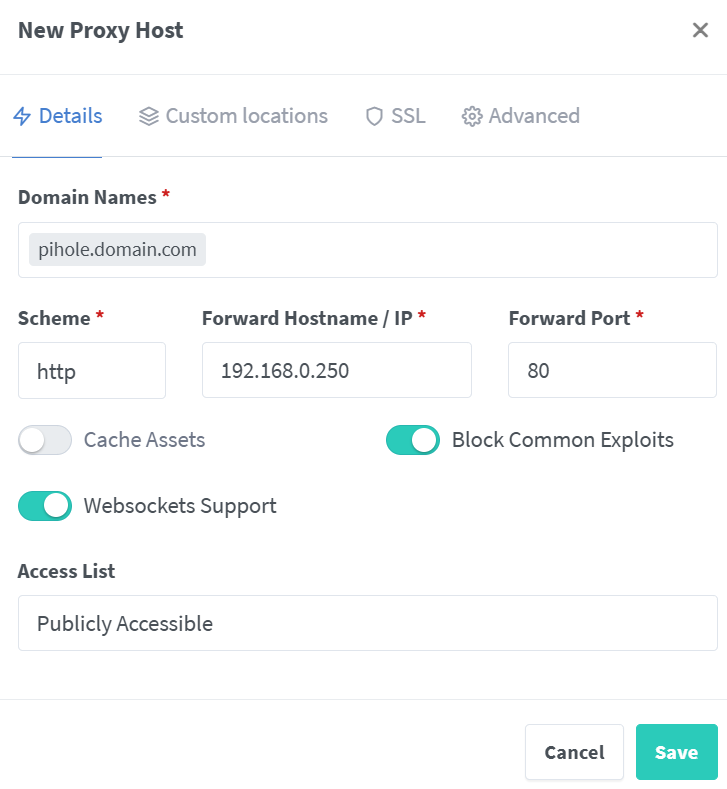
Go to the Nginx Proxy Manager web UI and create a new proxy host.
-
For Domain Names type in the URL you want to use, e.g.
pihole.domain.com. -
Leave the Scheme as
http, and type in your Pi-Hole server’s IP address under Forward Hostname/IP, e.g.192.168.0.250. -
For the Forward Port, you want to use
80if you didn’t make any changes to Pi-Hole’s web UI port. If you did change it, use that port here instead. -
Toggle on Websockets Support and Block Common Exploits, but leave caching off.
-
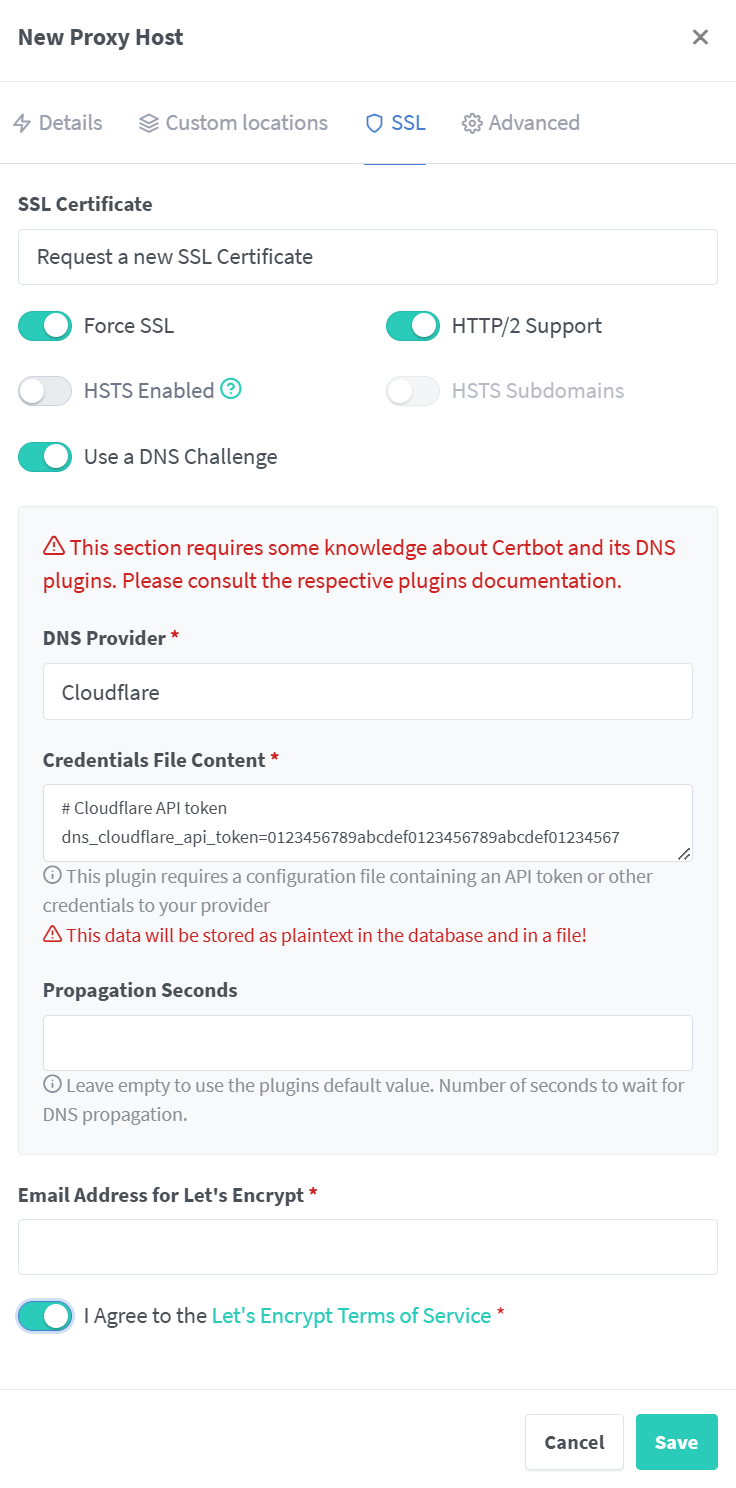
Go to the SSL tab, click under SSL Certificate and select Request a new SSL Certificate from the dropdown.
-
Toggle on both Force SSL and HTTP/2 Support, but leave HSTS Enabled toggled OFF.
-
Toggle on Use a DNS Challenge, then under DNS Provider choose your DNS provider from the dropdown. (I chose
Cloudflare.) -
Credentials File Content will be pre-filled with the necessary env variables depending on your DNS provider, you just have to provide the API tokens or secret keys. In my case using Cloudflare it uses the
dns_cloudflare_api_token=variable, followed by a bunch of characters. Replace these with your Cloudflare API token or other DNS provider’s secrets. -
At the bottom, type an email address, toggle on that you agree to the Let’s Encrypt TOS, and click Save.
Wait a moment for the TLS certificate to be provisioned, once it’s done we need to edit the Pi-Hole config file at /etc/pihole/pihole.toml on the machine running Pi-Hole.
- In
/etc/pihole/pihole.tomlfind the[webserver]block. First, scroll down to and change or comment outdomain = "pi.hole"and replace with the following:
domain = "pihole.yourdomain.com"
This change also has the perk of automatically redirecting you to the dashboard when you go to
pihole.yourdomain.com, without having to add/adminto the URL.
- Scroll down further, change or comment out
port = "80o,443os,[::]:80o,[::]:443os"and replace with the following: (Notice after443thesbefore theo.)
port = "80o,443so,[::]:80o,[::]:443so"
HTTPS would not work for me without this particular change, I think because
443osmakes HTTPS optional, but443somakes it required. Might also be because I am forcing SSL in Nginx Proxy Manager. YMMV.
Now you should be able to go to https://pihole.domain.com and the Pi-Hole dashboard with HTTPS. If you CANNOT access the web UI with https in the URL, try going instead to http://pihole.domain.com/admin first and click past the warning. After that it should work as per usual by going to https://pihole.domain.com/admin.
Fixing the Certificate Domain Mismatch warning
After using the above method to access the Pi-Hole dashboard via HTTPS using a custom domain, you will eventually get a CERTIFICATE_DOMAIN_MISMATCH warning in the Pi-Hole diagnosis page with a message of SSL/TLS certificate /etc/pihole/tls.pem does not match domain with regard to pihole.yourdomain.com.

You can either ignore this and keep on trucking, or you can make it go away (or prevent it bugging you in the first place) by doing the following:
-
Find the
fullchain.pemandprivkey.pemfiles for your proxy host (e.g.pihole.domain.com) in the directory where your reverse proxy’s TLS certificates live. Make copies of these two files. (In Caddy the certificates might be in$HOME/.local/share/caddyand in Traefik probably/etc/certs.)-
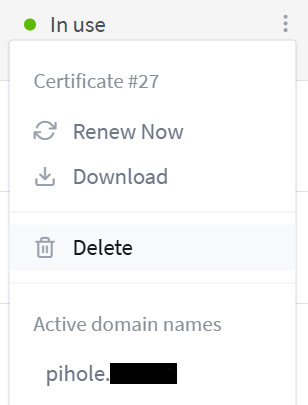
If using Nginx Proxy Manager, you can get these certificate files by logging into the GUI, navigate to the SSL Certificates tab, and look for the proxy entry you’re using for Pi-Hole.
-
Click the three vertical dots then choose Download from the dropdown menu. This will download a ZIP file with several files, including the two we need.
-

- First, create a copy of
fullchain.pem(this has two certificates) and name itpihole.pem. (Or whatever you prefer, just make sure it’s a.pemfile extension.) Then copy the contents ofprivkey.pem(this has the private key) and paste it intopihole.pem, in a new line under the second-----END CERTIFICATE-----. Should look something like this: (But with more gibberish.)
-----BEGIN CERTIFICATE-----
X69wLrJZGcMi%@9fpW^h!8kFe5BB
P7yf^Pvzc$8E7fX$ErQi&qcjzpQRt8
K*DhABHkAVYSsRYD%$GMX4NgKkY
$qs7^z5rs2DaZJBi=
-----END CERTIFICATE-----
-----BEGIN CERTIFICATE-----
1lDCLidHvoEBzCfk359DKvfOC22Yv+
K*DhABHkAVYSsRYD%$GMX4NgKkY
X69wLrJZGcMi%@9fpW^h!8kFe5BB
$qs7^z5rs2DaZJBi=
-----END CERTIFICATE-----
-----BEGIN PRIVATE KEY-----
MIG2ASuWV6eIPc4qcxripSnsJhW5mx6t
1lDCLidHvoEBzCfk359DKvfOC22Yv+ZB
Eck82ekS+Ojorr983DhABHkAVYSsRYJZ
Gh8aDHkn7vv78pa=
-----END PRIVATE KEY-----
- Save the changes to
pihole.pem. Now change the owner and permissions of the file:
sudo chown pihole:pihole pihole.pem &&/
sudo chmod 400 pihole.pem
-
Move the file to
/etc/pihole/pihole.pemon the machine running Pi-Hole. -
Edit the config file
/etc/pihole/pihole.tomland find the[webserver.tls]block. Under this, you should see the following:
cert = "/etc/pihole/tls.pem"
- Change this line (or comment it out and write a new one under it) to look like this:
cert = "/etc/pihole/pihole.pem"
- Save the changes and close the config file. Reload the Pi-Hole dashboard if already open, or open it in a new browser tab. The warnings should be gone and should not come back. It if doesn’t go away immediately, reboot the machine running Pi-Hole.
Unfortunately, as far as I can tell, you will have to do this each time your TLS certificate it renewed. So eventually you may just want to live with the warning instead of going through this process every time.
Run and sync two Pi-Holes
When you make Pi-Hole your primary DNS it becomes a critical part of your network — if it goes down, devices on your network won’t be able to resolve any domains. For this reason, you may want to run another Pi-Hole as a secondary DNS in case the host running your main instance of Pi-Hole crashes. (These things happen.) If your entire network will go down from an issue with Pi-Hole, running a second instance of it makes a lot of sense.
As of the release of Pi-Hole v6 (see below for details) the only way to sync configurations between two Pi-Hole instances is with Nebula Sync. I have yet to use it myself, but once I do, I will update this space.
The original Pi-Hole syncing solution, Gravity Sync, has been archived and will no longer be maintained. It does not work with Pi-Hole v6, though its last release still works with Pi-Hole v5 and older.
Aside from Nebula Sync as mentioned above, there is another actively-maintained alternative, Orbital Sync, but support v6 is not yet available. (Although it is coming.)
There is also a more recent project called Pihole-Sync that might be of interest.