Setup SSH authentication to push to Github
Setting up SSH keys and pushing to GitHub without needing to enter a username and password has always been a good practice, but now that GitHub is deprecating basic username and password authentication, it's past time to get this set up if you haven't already. It's pretty simple and only takes a few minutes, here's the quick and dirty instructions.
Table of Contents
Add the key in GitHub
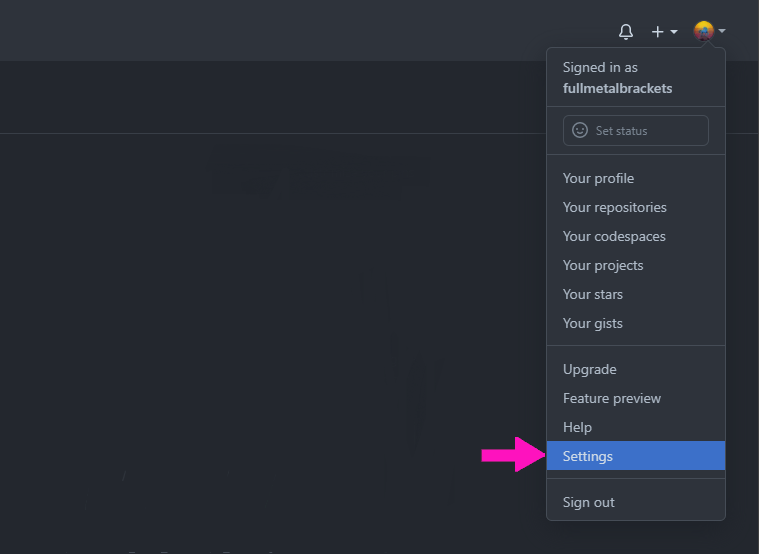
First we need to add our computer’s SSH public key to GitHub. Login to your GitHub account, click on your profile icon in the top-right corner, then click on Settings.

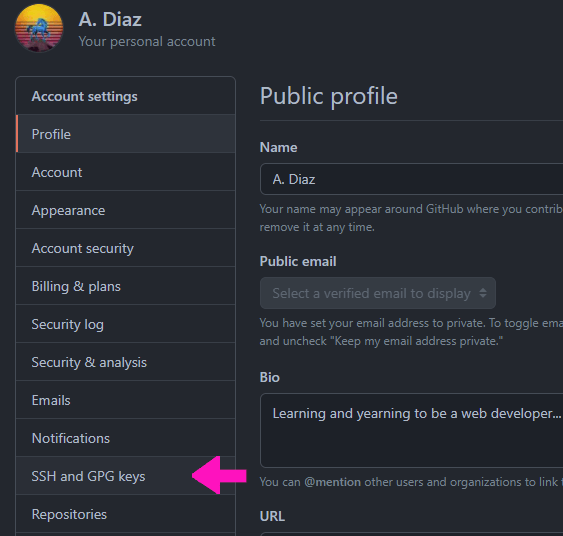
Next click on SSH and GPG keys in the menu on the left:

Now click the green New SSH key button near the top-right side of the screen:

Now use your favorite text editor to open your computer’s SSH public key, located in your ~/.ssh directory (read this if you have no idea what I’m talking about) and most likely named id_rsa.pub, if you used the default options when you generated the key. In the key file you’ll see a jumble of text that looks something like this:
ssh-rsa AAAAB3NzaC1yc2EAAAABIwAAAQEAklOUpkDHrfHY17SbrmTIpNLTGK9Tjom/BWDSU
GPl+nafzlHDTYW7hdI4yZ5ew18JH4JW9jbhUFrviQzM7xlELEVf4h9lFX5QVkbPppSwg0cda3
Pbv7kOdJ/MTyBlWXFCR+HAo3FXRitBqxiX1nKhXpHAZsMciLq8V6RjsNAQwdsdMFvSlVK/7XA
t3FaoJoAsncM1Q9x5+3V0Ww68/eIFmb1zuUFljQJKprrX88XypNDvjYNby6vw/Pb0rwert/En
mZ+AW4OZPnTPI89ZPmVMLuayrD2cE86Z/il8b+gw3r3+1nKatmIkjn2so1d01QraTlMqVSsbx
NrRFi9wrf+M7Q== bob@hostname
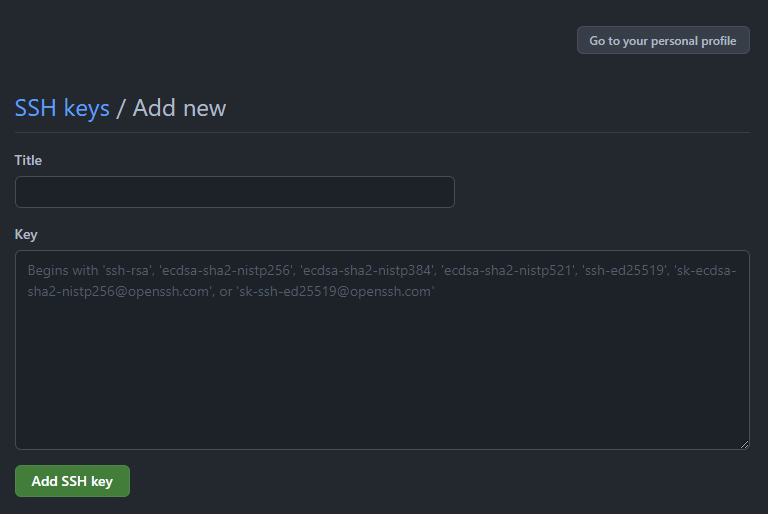
Copy all this text to clipboard. Now go back to GitHub, paste the SSH key text in, add a title (I usually put the hostname of the computer this key belongs to) and finally click Add SSH key.

That’s it! You should now be able to push to GitHub via SSH and without password prompt. Now, go into the directory of the project you want to push to GitHub. On Windows, we can go into the project folder then right-click > Open Powerbash. Note that if you don’t have Powerbash in your right-click menu, you’ll have to add it. (Alternately, you can install Windows Terminal and add that to the right-click menu, which is my personal preference for doing anything on the command line in Windows.)
From inside the project directory, you can initialize the git repo with git init command. This creates the .git hidden directory that contains stuff you’ll never really need to look at. Pretend this directory does not exist, but take note that if you ever need to re-initialize the repo in a directory for any reason, the quickest way is to simply delete the .git directory. Now we’ll use a series of commands to prepare our project files to be pushed to GitHub.
First, we have to “stage” files that we want to add to a commit. This is done with the git add command followed by the file name, but usually you’ll want to stage all modified files without having to list them all out. This is done by using a period instead of a file name: git add .
Next we have to “commit” the staged files, including a short message describing what we changed. Always include a commit message as best practice, but for your first commit on a personal project you should simply add the message “first commit.” A message is added to a commit with the -m option. Here is the full command: git commit -m "first commit"
If you get an error and Git asks who you are, then it’s probably your first time doing a commit on the computer you’re using. Use the following commands to register your username and email address on this computer with Git:
git config --global user.name "username"
git config --global user.email "[email protected]
Now we can re-try the commit and it should work. The next and final step is to push to GitHub. First, you will need to have created a new repository on GitHub and copied the URL for it. I will assume you know how to do that and skip it. If the new repo has a README.MD and/or .gitignore, your first command will need to be git pull followed by the URL to get those files on your computer. Otherwise, if the new repo is empty, we can go straight to git push. However, for the first push to a new remote repo, we’ll want to set the remote repo we are pushing to as the upstream master branch. Do so with this command:
git push --set-upstream [email protected]:username/repo.git master
Note that if you’d rather use main as the primary branch instead of master, use the following commands instead of the above, to set both the local branch and the remote one to main:
git push --set-upstream [email protected]:username/repo.git main
git branch -M main
And we’re done! Git will automatically keep track of any modified files in the project directory, as well as changes in the remote repository, and you can easily push changes to GitHub or pull from it if you (or a friend?) make changes there. You can use Git and GitHub for all sorts of stuff, not just your coding project. I use it for this website to quickly deploy to Netlify, and also to backup certain configuration files from Windows and Linux. (In private repos, of course.) The best way to learn anything is by using it, so feel free to use Git for as many things as possible, GitHub barely has limits for free users and you can always delete any trash repos you no longer care about.