Comprehensive guide to setting up Tailscale to securely access your home network from anywhere
Accessing self-hosted services from outside the home can be a challenge, especially when dealing with CGNAT and having to forward ports from the router. It can be complex to manage and potentially dangerous to your home network's privacy and security if not done right, but Tailscale makes it easy to set up encrypted peer-to-peer connections between devices across different networks. In this guide I will explain how I use Tailscale as a VPN for secure remote access to my home network.
Table of Contents
About Tailscale
Tailscale lets you set up a mesh virtual private network (VPN) for secure access to devices and self-hosted services on your home network from anywhere using the Wireguard protocol. An overlay network known as a Tailnet is created that all devices running Tailscale will join, with traffic between devices going through an encrypted Wireguard tunnel and using NAT traversal, without the need to open ports on your router.
The personal plan is free, allows three users and up to 100 devices. I use it mainly to access Plex on my home server (though I can access all my self-hosted apps) and use my Pi-Hole as DNS through my phone, tablet and laptop when I’m not home, and that is what this guide will help you do. For details, see this post on the Tailscale blog about how it works.
To be clear, Tailscale is itself not self-hosted and relies on Tailscale’s own relay servers (what they call Designated Encrypted Relay for Packets or DERP) when direct connections are not possible. Also, it is important to know that everything in Tailscale is open source except the control server, which manages communication between tailnet nodes by exchanging Wireguard public keys, assigning IP addresses, and coordinating secure peer-to-peer connections between devices. (The GUI clients for Windows and macOS are also closed source, which makes sense since those two operating systems are also closed source.)
There is an open source implementation of the control server called Headscale, however I have not used it and have no plans to, so this artcile will not touch on it.
Setting up Tailscale
First things first, go to the Tailscale website and create an account. This will create your Tailnet (private network for all your Tailscale-connected devices) with your newly created account as the Owner and which you’ll manage through the web-based admin console.
This guide will assume you’re running Tailscale on a Linux server, although the instructions also work for Windows WSL 2. (You can also install Tailscale on Windows and MacOS.) On your Linux server, use the following command to run the Tailscale install script:
curl -fsSL https://tailscale.com/install.sh | sh
By default using most Tailscale commands requires superuser privileges, i.e.
sudo. You can change that with the commandsudo tailscale set --operator=$USER, the specified user will then be able to execute Tailscale commands withoutsudo. The rest of the guide will assume you did this.
Once it’s finished installing, use the command tailscale up, go to the provided URL and login to connect the machine to your tailnet. (You’ll go through the same quick process for each Linux machine you add to your tailnet.) Now go to the Tailscale admin console and you should see the machine there.
By default all machines added to your tailnet need to re-authenticate every few months, which is a nice security measure, but you probably want to disable it at least for those machines that you trust and want to access through Tailscale long-term.
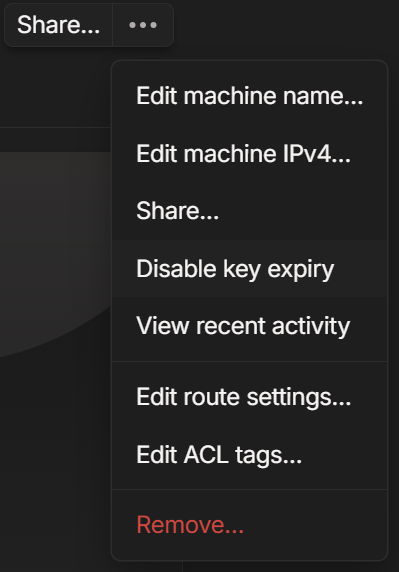
To do so, on the admin console go to the Machines tab, click on the three dots to the right of the machine’s entry, then from the dropdown menu choose Disable key expiry. You’ll need to do this for each new machine you add if you don’t want to have to re-authenticate later.

Once done, you’ll see a little expiry disabled badge under the machine in the admin console.
![]()
Next we’ll set up Tailscale on the phone/tablet, which is as easy as going to the app store, downloading the Tailscale app and opening it, then logging in to your Tailscale account and tapping the Connect button. You’re basically done now, you can access your server from the phone or tablet, but there’s some additional configuration we should do.
Configuring tailnet name, Magic DNS and HTTPS
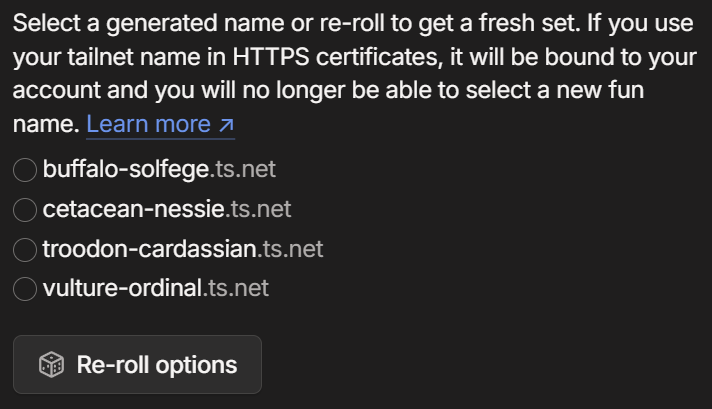
By default your tailnet name is something auto-generated like tailfe8c.ts.net. Instead you should generate a “fun name” that is more human-readable. You can’t just type one in, unfortunately, rather you choose from ones generated by Tailscale.

To get a fun tailnet name, go to the Tailscale console and click the DNS tab. Click the Rename tailnet… button and follow the prompts. You can keep re-rolling until you find a name you like. For future examples, we’ll assume your tailnet name is emperor-sloth.ts.net.
You may want to use HTTPS when accessing services and applications through Tailscale. It’s not super important, but it doesn’t hurt. Click the Enable HTTPS button.

Magic DNS is enabled by default, leave it that way since it’s required for HTTPS. (With it enabled you can’t access or reference nodes via hostname.emperor-sloth.ts.net and have to use Tailscale IP addresses only.) TLS certificates are issued on a per-machine basis, so you have to add a certificate on each machine where you want it. This will let you access the web UIs of your self-hosted services using HTTPS, but only through Tailscale. Again, by no means is this necessary, but it’s a nice to have.
Use this command to generate the certificate: (In this example the Linux server’s tailnet name is server and the tailnet fun name is emperor-sloth.ts.net.)
tailscale cert server.emperor-sloth.ts.net
Configuring Plex for Tailscale
Although you should be able to reach your Plex media server’s web UI via browser on your phone or tablet when connecting through Tailscale, the Plex and Plexamp apps will not work until you change some settings.
On the Plex web UI go to Settings -> Network and do the following:
- Set Secure connections to Preferred

-
Set Preferred network interface to Any
-
Make sure Enable Relays is unchecked
-
Go to Custom server access URLs and type in the server’s tailnet URL with the Plex port, e.g.
https://server.emperor-sloth.ts.net:32400

- Click on Save changes
Additional config for SMB and NFS
This is entirely optional, but I like to have access to my SMB shares on my laptop and even on my phone through Solid Explorer or X-plorer. Rarely used, but still handy. Per this issue on GitHub we need to do a little extra config for SMB to work through Tailscale. (See below for additional NFS config.)
First, find out your server’s main interface device name with the ip a command and pay attention to the output:
1: lo: <LOOPBACK,UP,LOWER_UP> mtu 65536 qdisc noqueue state UNKNOWN mode DEFAULT group default qlen 1000
    link/loopback 00:00:00:00:00:00 brd 00:00:00:00:00:00
2: en2sp0: <BROADCAST,MULTICAST,UP,LOWER_UP> mtu 1500 qdisc mq state UP mode DEFAULT group default qlen 1000
    link/ether 6f:cc:a2:e8:72:30 brd ff:ff:ff:ff:ff:ff
In the above case, the ethernet interface is called en2sp0, but for you it may be called something different like end0, eth0, etc. (Wi-Fi interfaces are usually wlan0 or similar.) Notice also the loopback interface named lo.
Edit the Samba config file at /etc/samba/smb.conf and add the following under [global]:
[global]
interfaces = lo enp2s0
bind interfaces only = yes
smb ports = 445
Restart Samba for the config change to take effect:
sudo systemctl restart smbd.service
Finally, we’ll use Tailscale Serve to allow the SMB traffic to be routed through Tailscale, using this command:
tailscale serve --bg --tcp 445 tcp://localhost:445
To access NFS shares through Tailscale, we need to add the Tailscale IP of the NFS client (the machine that will be accessing the shares) to /etc/exports, for example:
/path/to/share 100.143.11.92(rw,sync,no_subtree_check)
Setting up a subnet router
Technically, you can just install Tailscale on every device on your network and add them to your Tailnet, but that’s not necessary. You can instead only install it on one machine and use that as a “subnet router” to access other network resources. This is especially handy for accessing devices that you can’t run Tailscale on.
First, on the machine you want to use as subnet router, you need to enable IP forwarding. (This is straight from the Tailscale docs.)
If your machine has an /etc/sysctl.d directory (which most likely it does) then use these commands:
echo 'net.ipv4.ip_forward = 1' | sudo tee -a /etc/sysctl.d/99-tailscale.conf
echo 'net.ipv6.conf.all.forwarding = 1' | sudo tee -a /etc/sysctl.d/99-tailscale.conf
sudo sysctl -p /etc/sysctl.d/99-tailscale.conf
If your machine does NOT have the directory (ls /etc/sysctl.d returns No such file or directory) then instead use these commands:
echo 'net.ipv4.ip_forward = 1' | sudo tee -a /etc/sysctl.conf
echo 'net.ipv6.conf.all.forwarding = 1' | sudo tee -a /etc/sysctl.conf
sudo sysctl -p /etc/sysctl.conf
Also, if you are running firewalld on your server, you should allow masquerading with the following command:
sudo firewall-cmd --permanent --add-masquerade
Now advertise the subnet routes with this command: (This assumes your local IP addresses are 192.168.0.x)
tailscale up --advertise-routes=192.168.0.0/24
Now go to the admin console, on the Machines tab, and do the following:
-
Click the three dots to the right of the machine want you want to use as subnet router. (Notice the
subnetstag.) -
Choose Edit route settings… from the dropdown menu.
-
Click the checkbox for Subnet routes and click the Save button to finish.

One last thing, if you are running Tailscale on multiple machines in your home network, you should use the command tailscale up --accept-routes=false on those other machines, that way they will keep using local routes (e.g. 192.168.0.x) instead of going through the tailnet — you don’t want to access your local network resources through Tailscale when you’re home!
Setting up an exit node
This is an entirely optional step, but a very cool feature. You can set a machine running Tailscale to function as an exit node, so all traffic is forwarded through the machine running as exit node.
This way you can, for example, not only access your home network, but all internet traffic will be routed through your home internet as if you were home, so you also get the advantage of any hardware firewalls and network-wide DNS sinkholes on the network. Another use case could be installing Tailscale on a VPS and using it as an exit node to mask your IP, like a more traditional VPN.
First, if you haven’t set up IP forwarding, as explained above in the subnet router section. (If you setup a subnet router on the same machine you will use as exit node, then you already did this and can skip it.)
Once that’s done, use the following command to advertise the machine as an exit node:
tailscale up --advertise-exit-node
Now go to the admin console, on the Machines tab, and do the following:
-
Click the three dots to the right of the machine want you want to use as exit node. (Notice the
exit nodetag.) -
Choose Edit route settings… from the dropdown menu.
-
Click the checkbox for Use as exit node and click the Save button to finish.

Finally, to use the exit node on your phone/tablet open the Tailscale app, tap the Exit Node button at the top and the server you set as an exit node should appear as an option — choose it to turn it on.
To use an exit node from a Linux machine, use the following command: (Use the tailnet IP or machine name of your exit node.)
tailscale up --exit-node=<ip or name>
On Windows, click on the Tailscale icon in the system tray, hover over Exit nodes and choose your node from the menu.
Setting a Pi-Hole as Tailnet DNS
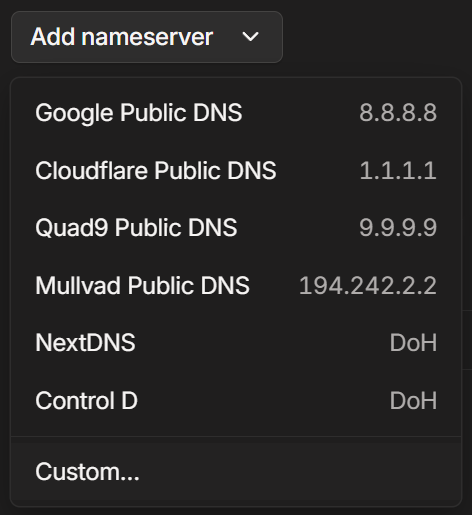
By default, Tailscale does not manage your DNS, and each machine on the Tailnet will use it’s own configured DNS settings. Tailscale lets you set a global DNS to be used by all machines when connected to the tailnet, and you can use the public DNS resolvers like Cloudflare or Google.
More importantly, you can also use a custom DNS server, including one self-hosted on a server in your network. In this way, we can use Pi-Hole from anywhere through Tailscale.
First, on the machine running Pi-Hole install Tailscale, login to add it to the tailnet and when prompted to tailscale up pass this flag:
tailscale up --accept-dns=false
Pi-Hole uses DNS servers configured within Linux as its upstream servers, where it will send DNS queries that it cannot answer on its own. Since you’re going to make the Pi-Hole be your DNS server, you don’t want Pi-Hole trying to use itself as its own upstream, and the --accept-dns=false flag achieves that.
You should also use
tailscale up --accept-dns=falseon other machines in your home network running Tailscale, so they don’t go through Tailscale for DNS queries.You want local DNS queries to stay on your local network, NOT go through Tailscale, or they’ll show up with Tailscale IPs (e.g.
100.90.80.70) instead of your local network IPs (e.g.192.168.0.100). This cannot be avoided with GUI clients on phones, tablets and desktops/laptops, when connected to Tailscale they will query Pi-Hole with Tailscale IPs.
To set the Pi-Hole as global DNS for the tailnet, go to the admin console and make note of the Pi-Hole’s tailnet IP address. Then do the following:
-
Go to the DNS tab and scroll down to Nameservers.
-
Under Global nameserver click Add nameserver and choose Custom… from the dropdown menu.

-
Enter the Pi-Hole’s tailnet IP and click Save.
-
Enable the Override local DNS toggle.
![]()
-
Login to your Pi-Hole’s UI and go to Settings -> DNS.
-
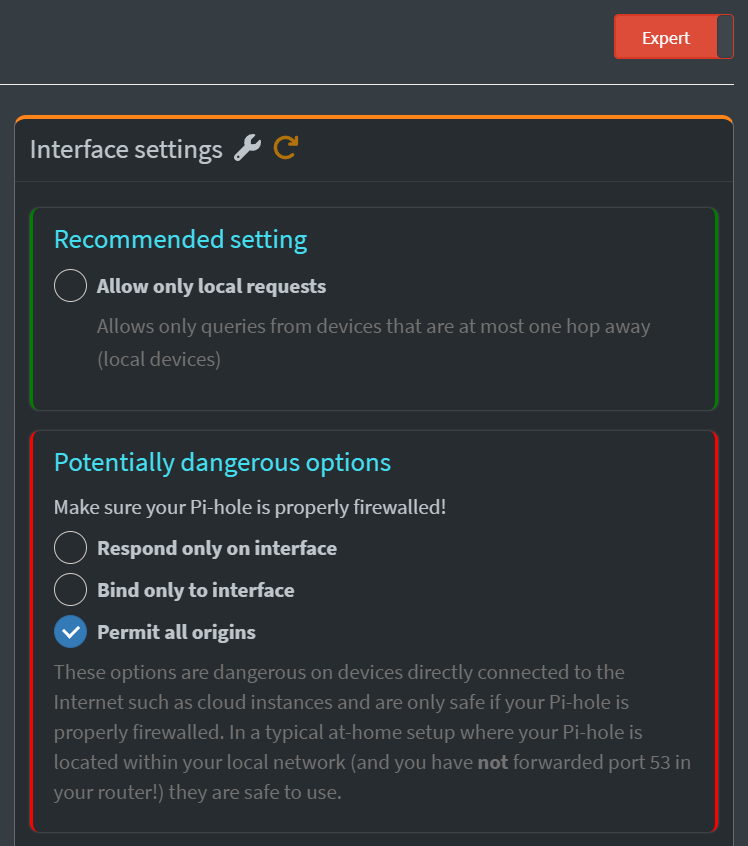
If using Pi-Hole v6, click on the toggle at the top-right to switch from Basic to Expert. (If using Pi-Hole v5 or earlier, this step is unnecessary.)
-
Under Interface settings, choose the option Permit all origins.

- Scroll down and click Save.
Now to test it out, connect to Tailscale on your phone/tablet and visit some websites. You should not be seeing ads and should start seeing the device’s Tailscale IP in Pi-Hole’s logs.
Transfer files with Taildrop
Taildrop is an Alpha feature that lets you securely transfer files between devices on a tailnet. To enable it, on the admin console go to the Settings tab, scroll down to Feature previews and switch on Send Files.
Transferring files from phones/tablets (whether iOS or Android) is super easy using the Share menu, just choose Tailscale from the options, then choose a tailnet machine to send the file to.
On Windows and MacOS you right-click the file, choose Share from the menu, choose Tailscale from the option, and then the tailnet machine.
Files received through Taildrop appear in the device’s default Downloads folder. (Except on Linux, see below.)
Unfortunately, sending and receiving files on a Linux machine is not as seamless right now, for some reason, but they’re working on it. Even on desktop environments there’s no Tailscale option when using right-click and Share, so you have to use terminal commands to both send and receive files via Taildrop.
To send from Linux, use the following command: (Be sure to include the colon at the end!)
tailscale file cp <file> <tailnet-name-or-ip>:
Receiving files on Linux also requires a command. Once a file is sent to a Linux machine, it doesn’t automatically appear in any directory, instead it goes into a “Taildrop inbox” and has to be fetched.
Use the following command to download any files in the Taildrop inbox: (If you don’t specify a directory it will download into the present working directory.)
tailscale file get /home/$USER/downloads
I found this blog post by David Eger with a bash script to run a daemon that continuously uses the tailscale file get <target>, but under the circumstances I just prefer sending files to my server using LocalSend. To use Taildrop with a NAS — specifically Synology, QNAP, Unraid or TrueNAS — see here.
Further reading
I’ve only scratched the surface on what Tailscale can do in this post, because all I use it for (so far) is to access my home network from my phone, tablet and laptop when away from home. Here’s some recommended reading for additional features not touched on in this post.
- Invite other users to your tailnet
- Manage permissions using ACLs
- Serve static pages on your tailnet with Tailscale Serve
- Route traffic to the internet with Tailscale Funnel