Setup a Samba share on Linux via command line
A quick and dirty guide on how to easily set up a Samba share on Linux that can be accessed from Windows PCs on the same network.
Table of Contents
Installing Samba
Samba usually comes installed with most Linux distributions. If you do need to install it, use the following commands to install Samba and all dependencies. On Ubuntu and other Debian-based distributions:
sudo apt install -y samba
On Arch Linux and Manjaro distributions, you need to use the following command instead:
yes | sudo pacman -S samba
Configuring Samba
After installation, you should have a default Samba configuration file in /etc/samba/ directory called smb.conf. First, we’ll backup smb.conf (just in case) and then create a new file a text editor:
sudo mv /etc/samba/smb.conf /etc/samba/smd.conf.backup
sudo nano /etc/samba/smb.conf
The default smb.conf has a whole lot of text, mostly informative/explanatory comments. (That you should read to learn what the different parameters are for.) Our new smb.conf file will remove this extraneous stuff and only keep the configuration options. Copy and paste the below into the file, edit with your own user and paths:
[global]
  workgroup = WORKGROUP
  server string = Samba %v
  security = user

[public]
  comment = Samba Share
  path = /path/to/share
  browseable = yes
  writeable = yes
  read only = no
  force user = bob
The above config will allow a specific user (which we’ll configure to use SMB shortly) to access the share after a login prompt. First, let’s explain the options in the smb.conf file briefly:
- Any settings under
[global]apply to all shares, share-specific config goes under the[public]block as we’ll discuss below. workgroup =is important if you’re accessing the share from a Windows PC, the default is most likely WORKGROUP unless you or someone else changed it. Just make sure it’s the same for any Windows PC you want accessing the share.security = useris the default security mode for Samba and the one most compatible with Windows. You don’t really have to specify this since it’s the default, but I like to anyway.[public]will be the name of the share, obviously change this to whatever name you’d like.path =will contain the direct path to the directory on the server that you want to share, like/home/bob/mediaor/mnt/data, etc.browseable = yesallows unrestricted browsing all directories and files within the share.writeable = yesallows write access (create/delete files) to the userread only = nois supposedly the same aswriteable = yesbut I use it anyway for good measure.force user =will restrict the SMB share to only be accessible by the specified user, which will have to login. This should be the default/admin user that you use to login to the Linux server, unless you want to create a specific user just for shares.
When you are done with the smb.conf file, save it and quit the editor. Now let’s check that the configuration is valid with the following command:
testparm
You’ll get some output here that’s self-explanatory, one of the lines should say Loaded services file is OK meaning your config is good.
Next we’ll need to add a user to Samba, as you’ll need to login from Windows with a username and password. Let’s assume our default user on the Linux server is user bob so we used force user = bob in the SMB config. We’re create an SMB password for bob with the following command, and when prompted create a password:
sudo smbpasswd -a bob
Next we need to set the owner and group to the Samba user (if it’s not already) to ensure there’s no permission issues accessing it.
sudo chown -R bob /path/to/share
sudo chgrp -R bob /path/to/share
Finally, start the services needed and enable them to auto-run at boot. On Ubuntu/Debian, use these commands:
sudo systemctl start smbd nmbd
sudo systemctl enable smbd nmbd
On Arch/Manjaro, use these commands instead (notice neither service has the trailing d):
sudo systemctl start smb nmb
sudo systemctl enable smb nmb
Now you should be able to connect to the shared directory from other computers on your network!
Accessing the Samba share from Windows
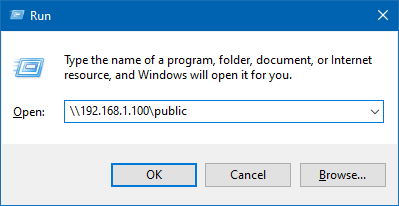
On Windows, go to Start Menu > Run and type the following (replacing with your Linux server’s IP address) and hit Enter:

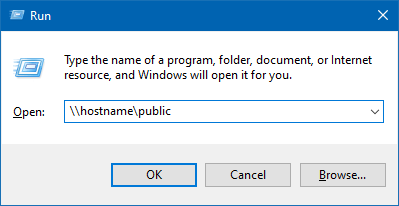
Or you can connect by hostname rather than IP.

You should now have the shared folder open in your Windows PC! For ease of access, right-click and pin it to Quick Access or map it as a Network Drive.
However, there MAY be an additional issue, as Windows 10 Home (but not Professional) apparently does not have the Local Security Policy settings (secpol.msc) that is required to interface with Samba. I can’t confirm this myself since I use Windows 11 where this is not problem, but if you have issues and Windows complains about secpol.msc, go here for detailed instructions on how to fix this issue.
Improve transfer speeds for Samba
After transferring files back and forth between Windows and Linux via the Samba share, you may notice it’s extremely slow! After some googling I found some additional configuration options from a company’s blog that claimed to improve network performance, and in my experience it works. (SMB protocol is just slow, though, don’t expect gigabit transfer speeds!)
Add the following code to your smb.conf file under the [global] block:
[global]
  workgroup = WORKGROUP
  server string = Samba %v
  security = user

  strict allocate = Yes
  allocation roundup size = 4096
  read raw = Yes
  server signing = No
  write raw = Yes
  strict locking = No
  socket options = TCP_NODELAY IPTOS_LOWDELAY SO_RCVBUF=131072 SO_SNDBUF=131072
  min receivefile size = 16384
  use sendfile = Yes
  aio read size = 16384
  aio write size = 16384

[public]
...
For an explanation of what these options do, check the original blog post linked above, the original code includes detailed comments for each option.
References
- Samba Documentation
- smbpasswd Manpage
- Eggplant Systems & Design blog post about improving Samba share performance
- Instructions to fix Local Security Policy issue