Using DNS over HTTPS with Pi-Hole and Cloudflared (Updated for Pi-Hole v6)
When using Pi-Hole as a network-wide ad blocker, your DNS requests still go out in plain text and can be seen by your ISP. DNS over HTTPS encrypts DNS requests between your Pi-Hole and the upstream DNS resolver. Here is a quick guide on how to set that up with Cloudflared daemon.
Table of Contents
What and Why
Pi-Hole by itself does not support using DNS over HTTPS or DNS over TLS, but it can forward DNS requests to another resolver that does support those protocols, which then forwards the encrypted requests upstream to a public DNS endpoint. In this guide I’ll show how to use either Unbound or Cloudflared as a forwarding resolver in Pi-Hole to use DNS over TLS with Quad9 as the upstream. See this blog post to use DNS over TLS instead.
Caveats and pre-requisites
This guide will assume you already have Pi-Hole up and running. If you have not yet done so, check out my blog post about setting up Pi-Hole on a Linux server. If you prefer to run Pi-Hole in a docker container, check out the Pi-Hole docker container GitHub page for instructions and a compose.yaml file to get up and running quickly.
Also, please note that although using DNS over HTTPS prevents your ISP or anyone else from snooping on your DNS requests, since they will be encrypted, whichever upstream DNS provider you use can technically see it. Obviously a measure of a trust is required in this case, but that would be the case with any upstream DNS, and only avoidable if you want to self-host your own DNS resolver. (Certainly possible, but beyond the scope of this guide.)
Install and setup the Cloudflared daemon
Cloudflared is normally used for Cloudflare Tunnels, but that’s optional and we won’t be using it in this setup, instead we’ll be using Cloudflared strictly as a DNS-Over-HTTPS proxy. This can be done either as a daemon in Linux or via a docker container.
Cloudflared as a container
If you haven’t already, you can install Docker and all dependencies quickly with the following command:
curl -fsSL https://get.docker.com | sh
To run Cloudflared in a container, we’ll use docker compose. Create a compose.yaml, copy and paste the below into it, and then run it with the command docker compose up -d.
services:
  cloudflared:
    container_name: cloudflared
    image: cloudflare/cloudflared
    command: proxy-dns
    environment:
      - "TUNNEL_DNS_UPSTREAM=https://1.1.1.1/dns-query,https://1.0.0.1/dns-query"
      - "TUNNEL_DNS_PORT=5053"
      - "TUNNEL_DNS_ADDRESS=0.0.0.0"
    restart: unless-stopped
Running Cloudflared as a container makes it easy to update, since you can simply use the commands use docker compose down to stop your container (or multiple containers in one compose file), then docker compose pull to grab the latest image, and recreate the container with the updated image by running docker compose up -d again. You can even automate container image updates with Watchtower. For details, see this blog post for my Watchtower setup.
Cloudflared as a daemon
To run Cloudflared as a daemon in bare metal Linux, you’ll need to download and install the package from the GitHub. Make sure you download the correct page for your machine’s architecture. This guide will assume you’re installing on Debian or Ubuntu, which means you’ll download cloudflared-linux-amd64.deb. See the Pi-Hole documentation for installation instructions on other distributions or Raspberry Pi.
# download latest deb package
sudo wget https://github.com/cloudflare/cloudflared/releases/latest/download/cloudflared-linux-amd64.deb

# use apt to install deb package
sudo apt install ./cloudflared-linux-amd64.deb
Since we’ll only be using Cloudflared as a DNS-Over-HTTPS proxy, and not to run a Cloudflare Tunnel, some manual configuration will be necessary. To run Cloudflared automatically at start up, let’s first create a cloudflared user to run the daemon.
sudo useradd -s /usr/sbin/nologin -r -M cloudflared
Now let’s create the config file with sudo nano /etc/default/cloudflared, paste the below into it:
CLOUDFLARED_OPTS=--port 5053 --upstream https://cloudflare-dns.com/dns-query
The above is the DNS over HTTPS endpoint for Cloudflare, but other public DNS resolvers support it. Each public DNS resolver has a different endpoint for DNS over HTTPS, so look it up if you want to use them. For example, to use DoH with Quad9 use the endpoint --upstream https://dns.quad9.net/dns-query and for DoH with Google use --upstream https://dns.google/dns-query.
Next we need to update the permissions for the config file and the Cloudflared binary to allow access to the cloudflared user we created above:
sudo chown cloudflared:cloudflared /etc/default/cloudflared
sudo chown cloudflared:cloudflared /usr/local/bin/cloudflared
Next create the systemd script with the command sudo nano /etc/systemd/system/cloudflared.service, copy and paste the below into it:
[Unit]
Description=cloudflared DNS over HTTPS proxy
After=syslog.target network-online.target

[Service]
Type=simple
User=cloudflared
EnvironmentFile=/etc/default/cloudflared
ExecStart=/usr/local/bin/cloudflared proxy-dns $CLOUDFLARED_OPTS
Restart=on-failure
RestartSec=10
KillMode=process

[Install]
WantedBy=multi-user.target
Finally, start the service and enable it to run at boot:
sudo systemctl start cloudflared
sudo systemctl enable cloudflared
To run Cloudflared as a daemon is bit more involved than running it in a container, and a bit more annoying to update it, but it can still be automated with cron. I suggest using a shell script via cron.weekly to download the latest .deb package, stop the cloudflared service, install the package, delete the downloaded file after install, and start cloudflared back up. Here’s how I’ve done it before:
Create the script to be run by cron weekly with command sudo nano /etc/cron.weekly/cloudflared-updater, then copy and paste the below into it:
#!/bin/bash

# download the latest cloudflared deb package
sudo wget https://github.com/cloudflare/cloudflared/releases/latest/download/cloudflared-linux-amd64.deb -P ~/downloads

# stop the cloudflared service
sudo systemctl stop cloudflared

# install the deb package with apt
sudo apt install -y ~/downloads/cloudflared-linux-amd64.deb

# start the cloudflared service
sudo systemctl start cloudflared

# delete the deb package
sudo rm ~/downloads/cloudflared-linux-amd64.deb
Now just make the script executable and make root user the owner:
sudo chmod +x /etc/cron.weekly/cloudflared-updater
sudo chown root:root /etc/cron.weekly/cloudflared-updater
A little extra and totally optional thing. When I had this setup in the past, I made myself a simple MOTD bash script to show me that cloudflared is up and running every time login to the server via SSH. If you want to do this, create the script with the command sudo nano /etc/update-motd.d/55-cloudflared (be sure another script isn’t named 55-something or just use another number), copy and paste the below:
#!/bin/bash

# empty space so MOTDs are not on top of each other
echo

# display the text "cloudflare status" in blue
echo "cloudflared status:"

# another empty space
echo

# output cloudflared status of is-active & is-enabled
sudo systemctl is-active cloudflared &&  sudo systemctl is-enabled cloudflared
Don’t forget to make it executable with sudo chmod +x /etc/updated-motd.d/55-cloudflared. Now whenever you login you should see an MOTD like this:
cloudflared status:

active
enabled
Configure Pi-Hole
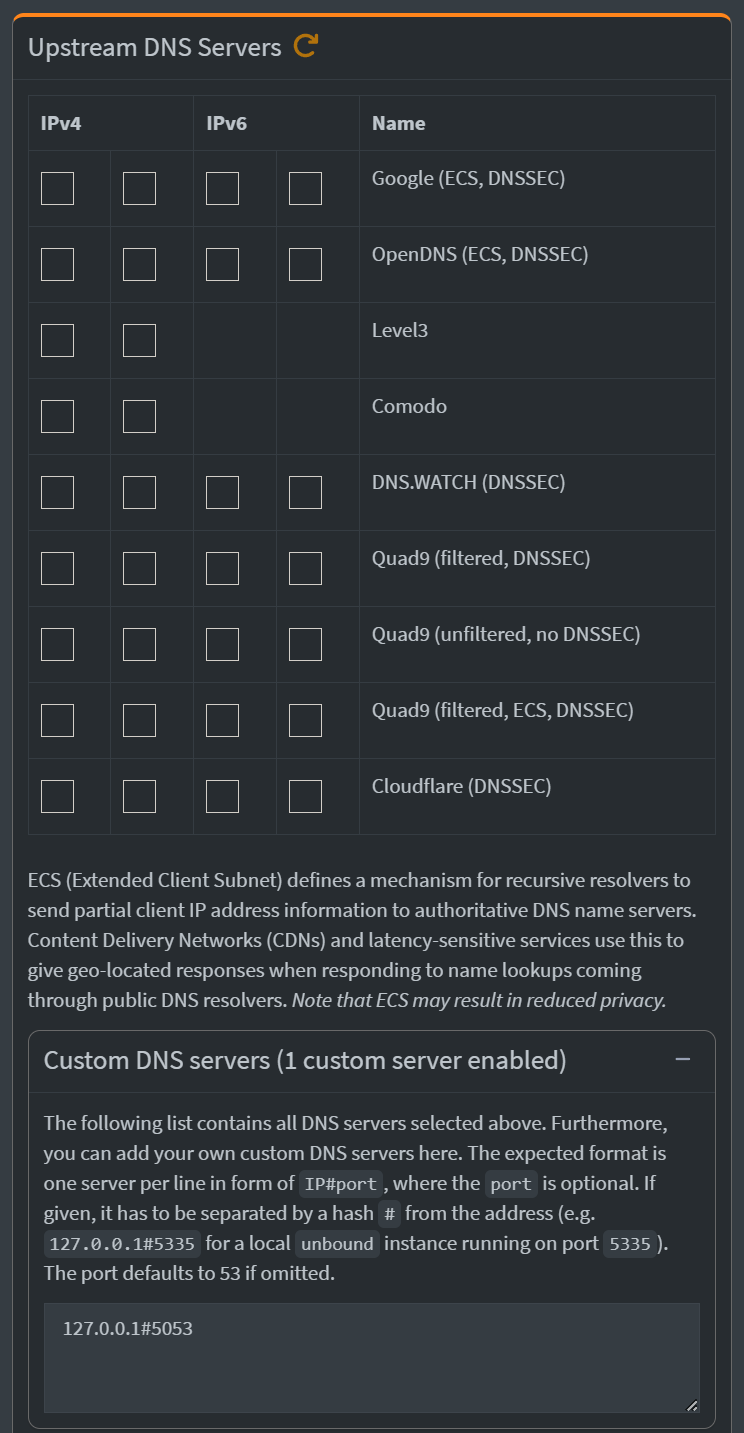
This is the last step. In the Pi-Hole dashboard click on Settings on the sidebar and then on DNS from the dropdown. Under the Upstream DNS Servers column on the left, uncheck any checked DNS servers, click on Custom DNS servers on bottom and type in 127.0.0.1#5053.

If running Cloudflared as a Docker container, instead of
127.0.0.1#5053, use the IP address of the Docker host as the Custom DNS server, for example192.168.0.200#5053.
Now click on Save & Apply. One last thing, though. There is a quick fix to mitigate a potential issue using Cloudflared that we’re going to make in the settings.
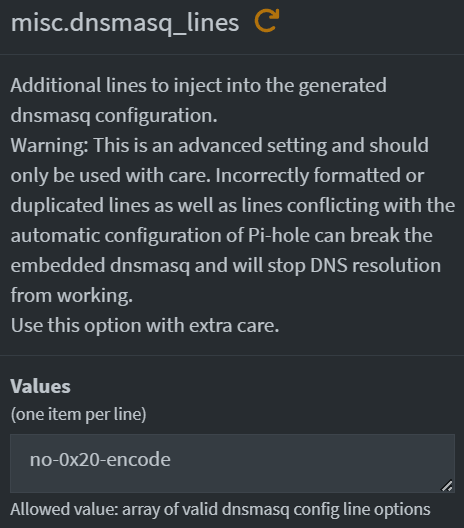
Go to Settings on the sidebar and click on All settings from the dropdown, then click on Miscellaneous. Look for misc.dnsmasq_lines and type in no-0x20-encode for the Value, then click on Save & Apply.

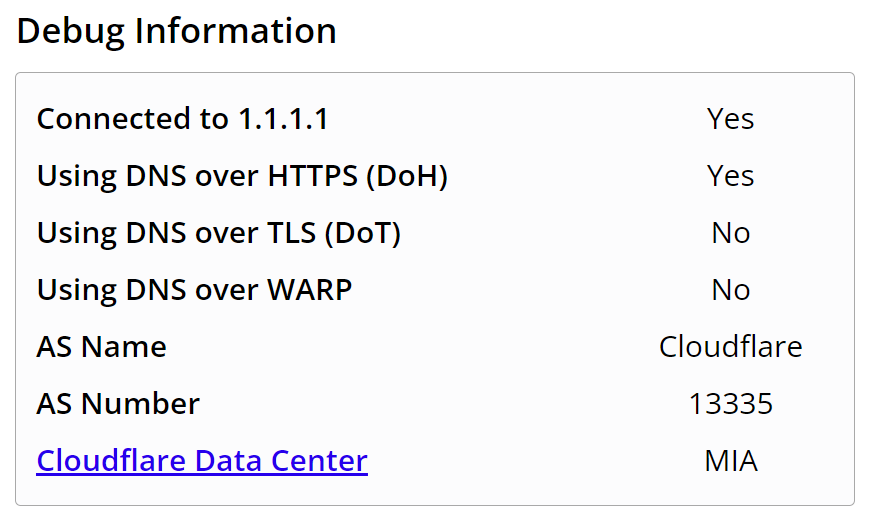
Your DNS requests should now be going out encrypted in HTTPS. If using Cloudflare for DNS over HTTPS, you can verify it’s working with their DNS checker at https://1.1.1.1/help, under Debug Information you look at Using DNS over HTTPS (DoH) and it should say YES next to it. (Note, this site may not properly work if DNSSEC is enabled in Pi-Hole, and will not detect other DNS over HTTPS providers like Quad9 or Google, it ONLY detects Cloudflare.)
