Using a forwarding resolver in Pi-Hole for DNS over TLS (Upgrade Pi-Hole v6)
A quick guide on configuring Pi-Hole to use either Cloudflared or Unbound as forwarding resolver to Quad9, for encrypted queries using DNS over TLS.
Table of Contents
What and Why
Pi-Hole by itself does not support using DNS over HTTPS or DNS over TLS, but it can forward DNS requests to another resolver that does support those protocols, which then forwards the encrypted requests upstream to a public DNS endpoint. In this guide I’ll show how to use either Unbound or Cloudflared as a forwarding resolver in Pi-Hole to use DNS over TLS with Quad9 as the upstream. See this blog post to use DNS over HTTPS instead.
Caveats and pre-requisites
This guide will assume you already have Pi-Hole up and running. If you have not yet done so, check out this blog post about setting up Pi-Hole on a Linux server. If you prefer to run Pi-Hole in a docker container, check out the Pi-Hole docker container GitHub page for instructions and a compose.yaml file to get up and running quickly.
Also, please note that although using DNS over HTTPS prevents your ISP or anyone else from snooping on your DNS requests, since they will be encrypted, whichever upstream DNS provider you use can technically see it. Obviously a measure of a trust is required in this case, but that would be the case with any upstream DNS, and only avoidable if you want to self-host your own DNS resolver. (Certainly possible, but beyond the scope of this guide.)
Unbound as forwarding resolver
Unbound is available on most, if not all, Linux package managers and should be installed that way whenever possible. On Debian and Ubuntu, for example, you’d install with this command:
sudo apt install unbound
As per the official docs, we’ll create a configuration file located at /etc/unbound/unbound.conf.d/pi-hole.conf with the below contents:
server:
    verbosity: 0

    interface: 127.0.0.1
    port: 5335
    do-ip4: yes
    do-udp: yes
    do-tcp: yes
    do-ip6: no

    prefer-ip6: no
    harden-glue: yes
    harden-dnssec-stripped: yes
    use-caps-for-id: no
    edns-buffer-size: 1232
    prefetch: yes
    num-threads: 1
    so-rcvbuf: 1m

    private-address: 192.168.0.0/16
    private-address: 169.254.0.0/16
    private-address: 172.16.0.0/12
    private-address: 10.0.0.0/8
    private-address: fd00::/8
    private-address: fe80::/10
Next, create another file at sudo nano /etc/unbound/unbound.conf.d/pi-hole.conf with the below contents:
tls-cert-bundle: /etc/SSL/certs/ca-certificates.crt

forward-zone:
 name: "."
 forward-tls-upstream: yes
 forward-addr: 9.9.9.11@853#dns11.quad9.net
 forward-addr: 149.112.112.11@853#dns11.quad9.net
These forwarding addresses for Quad9 provide malware blocking, DNSSEC, and are ECS-enabled. Check out all of Quad9’s options. Alternately you may consider using the Cloudflare TLS endpoint at
security.cloudflare-dns.com, which also supports DNSSEC and blocks malware.
Now restart Unbound so the new config takes effect:
sudo service unbound restart
Now skip to this section to configure Pi-Hole, or see below to use Cloudflared instead of Unbound.
Cloudflared as forwarding resolver
Running Cloudflared bare metal is a bit involved, but if prefer it that way, see this blog post about running Cloudflared bare metal as a systemd daemon.
Running Cloudflared as a Docker container requires less configuration, so I’ll explain that here. Create a compose.yaml file with the below contents: (Or copy & paste the below into an existing compose file if you prefer.)
services:
  cloudflared:
    container_name: cloudflared
    image: cloudflare/cloudflared:latest
    command: proxy-dns
    environment:
      - "TUNNEL_DNS_UPSTREAM=tls://9.9.9.9@853#dns.quad9.net,tls://149.112.112.112@853#dns.quad9.net"
      - "TUNNEL_DNS_PORT=853"
      - "TUNNEL_DNS_ADDRESS=0.0.0.0"
    restart: unless-stopped
To run the container, use command docker compose up -d and you’re good to go, nothing further needed for Cloudflared. We’re ready to configure Pi-Hole.
Configure Pi-Hole
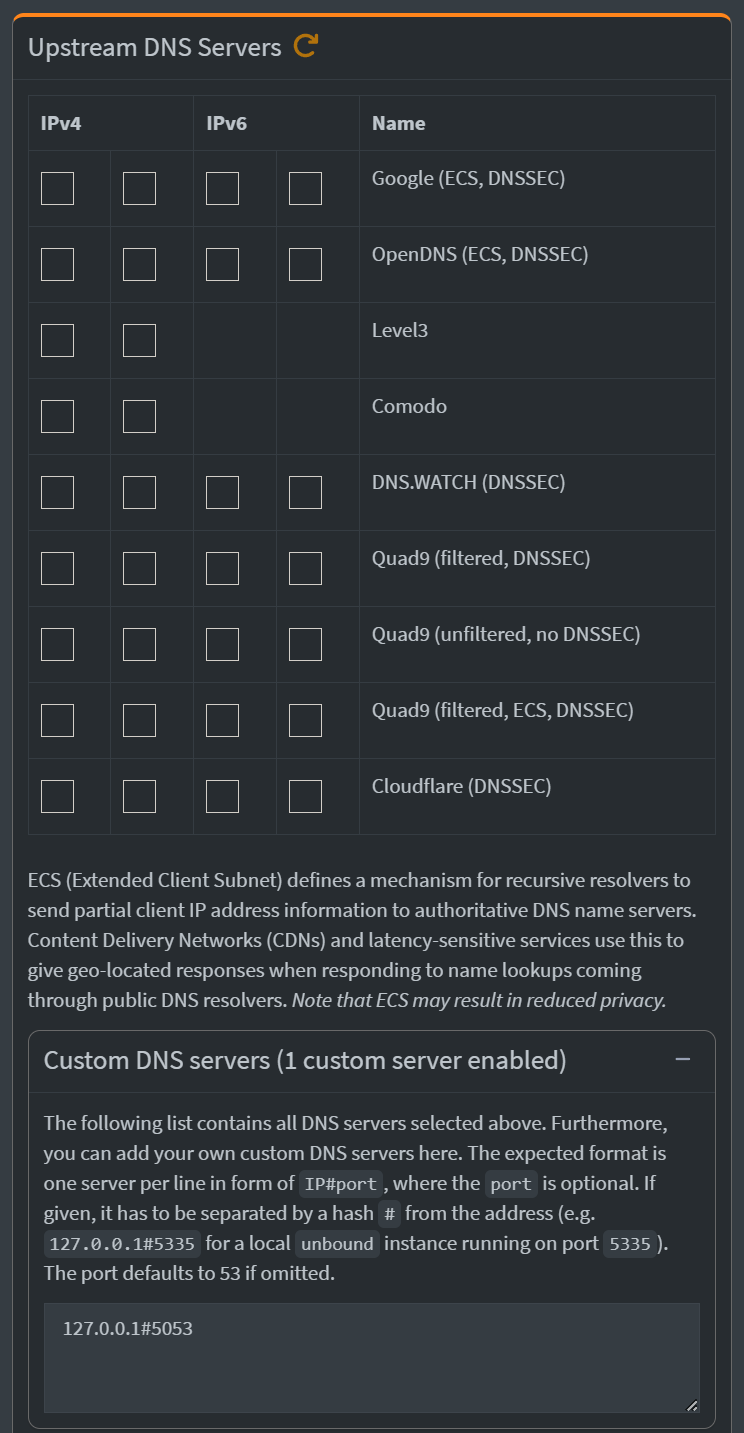
This is the last step. In the Pi-Hole dashboard click on Settings on the sidebar and then on DNS from the dropdown. Under the Upstream DNS Servers column on the left, uncheck any checked DNS servers, and click on Custom DNS servers on bottom.
If using Cloudflared, type in 127.0.0.1#5053. If using Unbound, type instead 127.0.0.1#5335. (By the way you can configure both to use other ports if you want to, I’m just using the default/recommended ports.) Now click on Save & Apply.

If using Unbound, you’re done! Your DNS queries should now be encrypted and sent upstream to Quad9 using DNS over TLS. If using Cloudflared as the forwarding resolver, there is a quick fix to mitigate a potential issue using Cloudflared that we’re going to make in the Pi-Hole settings.
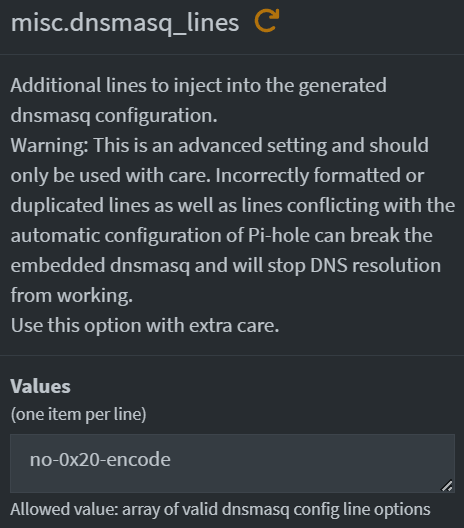
Go to Settings on the sidebar and click on All settings from the dropdown, then click on Miscellaneous. Look for misc.dnsmasq_lines and type in no-0x20-encode for the Value, then click on Save & Apply.

Now you’re done with Cloudflared. You can verify it’s working with the Cloudflare DNS checker, under Debug Information you look at Using DNS over HTTPS (DoH) and it should say YES next to it. (This site may not properly work if DNSSEC is enabled in Pi-Hole, and will not detect DNS over TLS to other providers like Quad9 or Google, it ONLY detects Cloudflare.)